Carolyn's Creative Connections

Welcome!

Wow, it sure has been a long time since I sent out a newsletter! For the last few months I've been telling myself, "Get your new web site done, and then send out a newsletter." Well, as is often the case with such projects, the new web site is taking longer than I thought so I don't want to delay any longer. Some of the links in this issue will send you to a partially finished web site - please try to ignore the unfinished parts for now!

Contents:


Carolyn's Creative Connections

How to Start a Blog

Blogging has been on my mind a lot lately - I'm building a new web site that inclues a blog, and I've been writing a lot of content for it. I'm also doing some blogging for one of my employers. If you've been thinking about starting your own blog, I have some tips for you.

First think about what the purpose of your blog is. All of the decisions you make will flow from that, so be clear in your mind on why you are doing it. What is the theme, if you have one? Pick out a title that fits the theme and purpose. While doing business blogging as part of my living, I was taught that one of the purposes of blogging and other social media is to give your company a more personal feel and create a connection with the audience. Whether your purpose in blogging is to make money or just express yourself, informality is expected so if you want to go off topic now and then and write about whatever is on your mind at the time, that is ok to do.

Read more: How to Start a Blog

return to top

Carolyn's Creative Connections


New Jewelry Products Added to Catalog
New Jewelry Making Products Added to Catalog

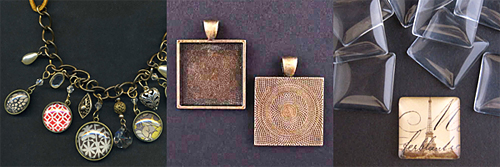
A lot of people are interested in making jewelry, but the process can sometimes be a bit daunting for a beginner. An easy way to make personalized jewelry is to glue domed glass pieces, called cabochons (or cabs), to paper with clear-drying glue and after drying and trimming gluing the cabochon into a pre-made metal frame. Photos or any favorite paper ephemera or decorative paper can be used. As a collector of such material, this type of jewelry turned me on the first time I saw it! One company that sells supplies designed to make this process easy is called Craft Fantastic. See how simple it is to use their products by viewing the Craft Fantastic Tutorial.

I've recently added a number of Craft Fantastic products to my catalog. In the above image, on the left is a section of a necklace I made that combines charms made with Craft Fantastic components mixed with other charms and beads. Another approach that is very popular is to make one image the focal point and suspend a single pendant from a chain. Try my new Embellishments section for decorative papers that can be glued to the glass. Of course you can use decorative papers you already have, or rubber stamp some designs if you use waterproof ink such as StazOn. A lot of people who make this style of jewelry like to stamp small words on tiny pieces of paper to include in the design - I have some tiny stamps in my collection designed just for that type of work - check out "Evocative Words II" in my Word Rubber Stamps section.

Whichever images you end up using, the PDF file includes a guide to what products in my catalog go with which size images. All of the Craft Fantastic products I sell are included in the guide as well as some by other manufacturers. Have fun!

return to top

Carolyn's Creative Connections


Unfinished Compost - Diary of Dad's Garden Unfinished Compost - Diary of Dad's Garden

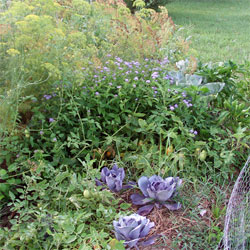
In 2013, my Dad expressed an interest in expanding his garden and growing some vegetables organically. We put our heads together and came up with the following strategy - in 2013 we would make his yard a better habitat for beneficial insects, then in 2014 we'd start planting vegetables. With a healthy beneficial insect population in place, we should have a better chance of getting any pest problems that might manifest on the crops under control in a natural way. Another goal we have is to be as frugal as we can - we both read The $64 Dollar Tomato and we hope to produce vegetables at a more reasonable cost than that! Neither of us have much experience growing vegetables organically. I've been gardening organically for about 10 years but where I live I don't have enough sun or space to grow most vegetables so I have concentrated on herbs and flowers. We will both be learning a lot as we go - some of you more experienced gardeners out there might find some of our actions strange, if so don't be afraid to offer feedback! We know we have a lot to learn!

March 30, 2014

Most of the vegetables we plan to grow are going to be direct-sown into the ground. It was too early to plant yet on March 30, so we worked on garden prep. We are going to attempt to use a form of permaculture gardening called the Hugelkultur method to build raised beds. One of our ideas is to put a chicken wire fence around the vegetable garden area to keep the rabbits out. Last fall Dad had done some pruning on some of the bushes and trees and left the cut branches lay where they fell during the winter. This was a good idea for two reasons - one, the birds were able to eat seed from the branches if they wanted (some of them, like the Rose of Sharon, had a lot of seeds which I've observed being eaten by house finches, gold finches and starlings), and it caused fallen leaves to gather among the branches which helped keep the ground warm and moist around the shrubs and trees during the harsh winter we had. We gathered up these branches and started building long mounds for our raised beds. We added some compost in various stages of completion and some more organic material. After the fence is erected, we plan to add more woody material, leaves, organic matter and top it off with soil. The walking paths between the planted mounds will be mulched.

Read more: Unfinished Compost - Diary of Dads Garden.

return to top

Carolyn's Creative Connections


Route 66 Gasconade Bridge Route 66 Gasconade Bridge

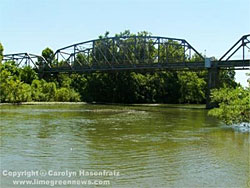
Here is a press release about an endangered historic bridge on Route 66 in Missouri:

"Hazelgreen, MO: Route 66 enthusiasts from all over the world will gather at 3:00 p.m. at the west end of the Gasconade River Bridge near Hazelgreen, MO on Saturday, March 14 to voice their support for a Missouri Route 66 and Ozarks icon, that being the bridge across the Gasconade River in Laclede County, Missouri. This ever-growing group of organizations and concerned individuals has worked tirelessly to save this bridge, including, at this point, seeking to have the bridge placed on the National Register of Historic Places. Over 200 people are expected to attend the rally. Having recently received notification that the bridge is indeed eligible for inclusion in the National Register of Historic Places, the Lebanon-Laclede County Route 66 Society (LL66), a 501(c)3 nonprofit, has come forward as this group's supporting organization moving forward.

Following the 3:00 p.m. rally, attendees will meet with other activists, historic preservationists, members of the Route 66 Association of Missouri, Laclede County Government Officials and officials from the state to discuss the Gasconade River Bridge and what can be done to save this historic structure. This meeting will be held at 5:00 p.m. at the Lebanon-Laclede County Library, located at 915 S. Jefferson St. Everyone with questions, specific interests, or desired involvement in the bridge is welcome to attend. The intent of the meeting is to discuss plans of action, forming of a committee, and discussion of any developments or findings since the last rally in December 2014.

View video on YouTube: Help Save a Route 66 Landmark! MoDOT closed the Gasconade Bridge in Missouri


Read more: Route 66 Gasconade Bridge.

return to top

Carolyn's Creative Connections


Upcycle a Metal Tin with Decoupage Upcycle a Metal Tin with Decoupage

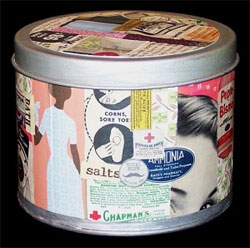
A lot of gifts and products come in decorative metal tins. Usually I don't like the design already on the tin and prefer to cover it with something else. Turn a humdrum tin into a treasure with decoupage!

What you will need:
Images on paper to decoupage
Scissors
Scrap paper
Metal ruler
Optional: rubber stamps
Timber Brown StazOn stamping ink
Metal tin
Sandpaper
Rag
Small flat paintbrush
Water container
Paint palette with wells
Old credit card
Water based matte medium (if you prefer a glossy surface, use gloss medium)
Aleene's Turbo Tacky Glue
Sponge
Metallic Silver StazOn or other silver paint appropriate for metal
Silver Ribbon
Cardstock


To begin, gather together paper pieces with imagery that you like. This project will work best if they are on thin, opaque paper (not tissue paper). For my sample I wanted to create decorative tins for the bath, so I collected nostalgic images with a bath and personal products theme. Some of my images were downloaded from the Internet and printed for me at an office supply store. Some were cut out of magazines and catalogs, some vintage, some newer. Others were purchased from craft suppliers.You can also stamp images onto paper with permanent ink, such as the StazOn Timber Brown I used in this project. I stamped words from the rubber stamp set "Products on the Kitchen and Bath" onto narrow strips of torn scrap paper. Use any color of stamping ink you like as long as it is waterproof.

Read more: Upcycle a Metal Tin with Decoupage.

return to top


Carolyn's Creative Connections

Carolyn Hasenfratz Thank you for reading Carolyn's Creative Connections! Until next time,

Carolyn Hasenfratz