Photo by Carien Van Hest. Both sides of the mini accordion book I sent her with its two-sided envelope.
Back in 2019, I made a couple of square mini accordion books, 2″ x 2″ in size when folded up. While sending out my 2020 Christmas cards, I finally made envelopes for holding four of them and I sent them out to a few people in my Mail Art network. Here is an article I wrote about how I made that batch of little books – Made From Scraps: Mini Accordion Books.
In the spring of 2020, shortly after the pandemic started, my husband Tom and I started hosting a #virtualartparty online for several weeks in a row to help ourselves and people we know cope with loneliness and anxiety. During the second session, I demonstrated how to make these little accordion books since they can be made from scraps and supplies many people already have around the house. At the end of this article is the archived video of that accordion book session. I started two books that afternoon, which I finally finished recently.
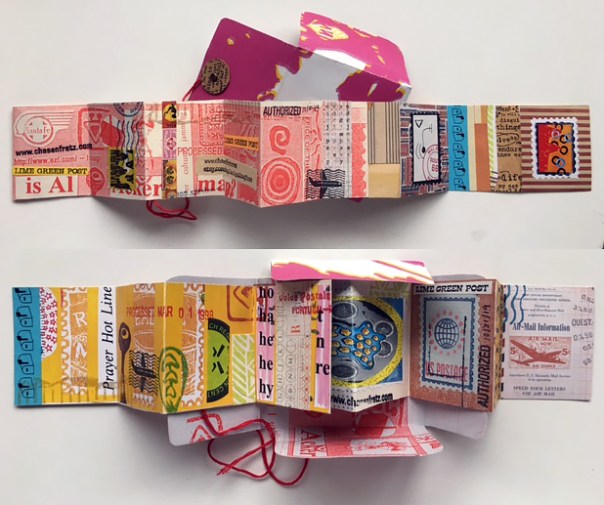
The image below shows the first book, titled “The Wonder of Life”. The top two images are of each side semi-folded. Below that are some close-ups of different sections of the book. To make these mixed media collage compositions, I combined found paper scraps, rubber stamping, design tape, stencils, marker drawing, and image transfers made from clear packing tape. Here is an article I wrote about how to make the image transfers – Art Journaling With Stencils and Image Transfers.
Mini book by Carolyn Hasenfratz Winkelmann called “The Wonder of Life”.
The next image below shows several examples of image transfers I was making next to sections of the stretched out accordion books that I was trying to coordinate with. I knew I would not know exactly how the semi-translucent transfers would look when they were laid over the underlying paper collage, but to make sure they were at least somewhat harmonious I looked for images for my transfers that reflected the colors and shapes of images I used in my first layer.
Coordinating transfer images to lay over collaged images.
I made a template for an envelope to fit the books or any thin 2″ x 2″ object for people to download and use to make an envelope for their book if they so wished.
Mini Book Envelope Template
I used the above template to trace two envelopes onto cardstock. I cut the envelopes out and made folds where the dotted lines are in the template so that the envelopes would be thick enough for the little books. With a circle punch I cut little circles to use for making a string closure. I made extras knowing I was going to put transfers on these circles – I wanted to be able to choose from several to get ones that looked good with the finished envelopes.
My next step was to paint the fronts and backs of each envelope with clear acrylic medium, letting the medium dry before I flipped them over to coat the other side. This step was for three purposes – to increase durability, to reduce wrinkling when I later applied layers of transfers and paper, and to make the paper more receptive to the slick tape transfers. When all was dry, I applied transfers to the outsides of the envelopes using clear medium as the glue and burnished them well to remove any air bubbles. After they were dry I trimmed the transfers to the edges of the envelopes.
Applying tape transfers to cardstock envelope. Envelopes after trimming.
For the insides of the envelopes, I used the acrylic medium to laminate a pieces of paper with a matte finish to the insides of the envelopes. I wanted a matte finish for the insides instead of a shiny finish so that the envelopes would not stick to the books when stored.
The final steps in finishing the book covers were to attach the small cutout discs I made earlier with small brads, and wind embroidery thread around the discs to make a string closure.
Many years ago, as one of my Mail Art projects, I used to fold two-inch wide pieces of paper into little accordion books and decorate them with rubber stamps and pieces of paper that I cut out from incoming Mail Art and decorated envelopes. I carved a rubber stamp with a little graphic of a Mail Box and the words “Bits of Mail” to stamp on the little book covers. Before sending them out, I dated and numbered them on the back. I saved one example for my archives and made a few color copies to use later as collage inspirations. While I was getting the color copies made, it came up in conversation with the copy center worker that one of the black and white machines had red toner in it. I made a lot of copies with the red toner because I knew I’d find uses for the copies later!
One of my original mini accordion books from 1998 with some color and red ink copies I made at the time for future collage work.
Some of my old collage papers along with my Mail Archives had been in storage unseen for 20 years or more. I’ve been getting some of them out lately as I move stuff. With fresh eyes, I’m getting some new ideas and inspiration for improving old ideas. I decided to take these old copies and make new versions of the mini accordion books.
First I cut up the copies that weren’t already in strips into two inch wide pieces, the same size as the originals. Then I folded them and glued one red ink copy to one color copy back to back to make longer books.
Old copies with color ink and red ink cut into two-inch strips, folded and glued to make mini accordion books.
I had a large paper crafting stash by 1998 already because I started making collages in 1985 in my first college design class and I’ve been collecting interesting papers for collages ever since. In the intervening years, there are a lot more paper crafting supplies available and some of them are a lot more to my taste than what was available in the late 1990s. Back in the day I would have said I was a “weird” stamper not a “cute” stamper. I also enjoy sophisticated antique imagery and have a lot of papers from two of my favorite brands, Tim Holtz and 7 Gypsies, in my stash. I decided that the Tim Holtz idea-ology Correspondence paper pad was a good fit for this project and I glued some of the postal themed textures onto a selection of the blank pages of my books. The dominant colors in this series are red white and blue which looks good with the red toner ink on some of my papers and the postal motifs fit the “Bits of Mail” theme.
Next I went through I box of paper scraps that I keep for teaching a card class that I run from time to time on how to make greeting cards from little scraps, rubber stamps and stencils. I took out a selection of papers that I thought would make good backgrounds and glued them in a random fashion to every other page, leaving some blank.
Mini accordion books ready for adding content.
There is an old trick that I learned in drawing class long ago to help get unstuck if you are facing a blank piece of paper with no ideas – draw a quick frame around your drawing area before you start. This helps because it’s less daunting to start drawing on a paper that you’ve made some marks on than a blank surface. I get the same creative boost from using scrap papers for perhaps a similar reason – there is already some content there, however sparse and random, and that is often all I need to get me going in a creative direction.
The little accordion books I’ve made are pictured above ready to add content. What kind of content would that be? There are lots of things I could do with these little books. I could write, draw, stamp or paste in words and/or images to make a finished artistic statement. I could use them as a storage and display folio for tiny works of art such as postage stamps, faux postage stamps or tiny photos and images. I could send them off into the Mail Art network as an “add and pass on” project. What would you make?
For additional inspiration, here are some samples of tiny books made by other people that I’ve received through the mail over the years. People of any age and ability level can make tiny books. Why not try one?
After Gauguin we looked at some of the other galleries. Tom is in red, Mike is in Yellow.
Yesterday my husband Tom and I attended the last day of the Gauguin exhibit at the St. Louis Art Museum, Paul Gauguin: The Art of Invention. Our friend Mike went with us and treated us to the tickets that he had earned from doing volunteer work.
When I first became interested in studying art, I wanted to be a painter. When I took ceramics and printmaking for the first time, I lost interest in painting and stopped reading about it as much as I used to in favor of my new passions. Over the years I also have done some pretty intense study of fiber arts, various crafts, collage, Dadaism, neo-Dadaism and Mail Art, ‘Zines, book arts, Outsider Art, Pop Art, photography, computer animation, web design, architecture, graphic design, the decorative arts, archaeology and anything Mid-Century Modern. Impressionism and Post-Impressionism were the first kinds of painting that drew me in but over the years I came to prefer Surrealism and Abstract Expressionism as painting styles. I hadn’t done any reading on Gauguin for a long time.
Some of Gauguin’s wood cut prints and a handmade book.
I really enjoy artists and designers who work in a variety of media, such as Alexander Calder, Henri Matisse and Frank Lloyd Wright. A lot of times I feel guilty about having so many interests and dabbling in so many different occupations and areas of study. Today’s society seems mostly to expect you to do only one thing but that is not and never will be “me”. So at this Gauguin show I was very intrigued to see some of Gauguin’s ceramics, wood carvings and woodcut prints alongside the paintings. There were ceramics and decorative objects from Gauguin’s personal collection as well as Oceanic and Peruvian art that was representative of the cultures Gauguin was influenced by. He was also at various times a sailor, a stockbroker and a writer. People like this make me not feel so weird!
The bright green and bright red ceramics and the one that kind of looks like a gourd are from Gauguin’s collection. The other more figurative ceramics were made by him. Some of these ceramics were inspired by paintings he owned by other artists, and the green jug was in one of his paintings. It’s always interesting to see artists’ personal collections!
As a former ‘zine publisher (Lime Green News 1991-1998), I was excited to see a woodblock print graphic in the exhibit that Gauguin carved to help him publish his own newspaper, which could be considered a type of ‘zine. I’m currently taking a Mass Communications class and in our textbook Mass Communication Theory: Foundations, Ferment, and Future by Stanley J. Baran and Dennis K. Davis, I’ve highlighted a very intriguing sentence: “Extremists were often forced to rely on older media like pamphlets, handbills and political rallies.” I don’t know if Gauguin would have been considered an “extremist” in his time but he was critical of religion and government and his lifestyle was, to put it politely, pretty “bohemian”. When I read the above sentence in my textbook I thought of the history of self publishing and the many forms it can take. Before movable type printing presses, documents were hand written or perhaps laboriously printed with hand-printing methods such as stamping and wood block printing. Later there were typewriters, carbon paper, mimeographs, copy machines, desktop computers with printers and the World Wide Web, making self-publishing easier and more accessible.
When I was ‘zine publishing, I used to make my originals on paper to be copied on a copy machine at the office supply superstore. I started out with text printed out on an inkjet printer on my 1983 Commodore 64 computer, which I used for all my word processing until 1995. I essentially made big collages for my pages, combining the printed text with a variety of graphics, collages and hand-drawings. If I wanted to add color I would sometimes carve a rubber stamp and stamp it on the finished prints. I think the largest edition I ever made of my ‘zine was 100, so stamping 100 times to add a bit of color was feasible.
I got a Windows computer in 1995 with a black and white laser printer. At that time I got Internet access for the first time and started reading on the World Wide Web. My first web site went live in 1997. Gradually I made my ‘zine using more modern desktop publishing methods and by learning software such as the Microsoft Office suite, Corel Draw and Photoshop. The last years of my ‘zine incorporated more and more “modern” techniques but were still made as big collages with some hand-embellishments before copying. In 1998 I just switched my ‘zine content over to my web site, which although a bit out of date in spots is still live (www.limegreennews.com). It needs some (ok a lot of) work because I’ve been neglecting it in favor of the blog you are reading now.
Publishing online is very satisfying, but I miss the lower-tech, handcrafted methods of self-publishing sometimes. I still like book arts in various forms. I’d like to write about or engage in some self-publishing as I work on my master’s degree if possible. It’s been on my mind ever since reading that sentence in the textbook. I got out some of my old ‘zine originals to go down memory lane and think about some possible research ideas. ‘Zine publishers do a lot of trading and I had a big collection of other people’s ‘zines plus material they sent me for consideration for publication. I donated the bulk of my collection to the Poetry and Rare Books collection at the University of New York at Buffalo some years ago but I did save a few things I especially liked. I have no idea what they kept of my collection if anything, but they did have a subscription to my ‘zine when it was in publication and I didn’t know of anyone else who might be interested! I didn’t save much of the “extremist” stuff for my own collection because it frankly scared me and was one of the reasons I dropped out of the printed ‘zine scene – it helped contribute to a major anxiety attack that I eventually received treatment for and recovered from. I don’t think I’ve ever said publicly why I dropped out of the ‘zine and Mail Art scene suddenly but that is a major part of why I did that. I do miss aspects of it though. I’m kind of hoping that working on my degree will bring opportunities to do some research on this era of communication or even get back into it in some way. I might even re-publish on this blog some things that are not too embarrassing that aren’t yet online. We’ll see!
Just for fun, since the art show I just saw included Oceanic art and some work by Gauguin that shows how he was influenced by that art , here is what the cover of Lime Green News #2 looked like. I took a postcard with rubber stamped art work that I liked from another mail artist and taped down some sketches from my then-current Oceanic art history class. I drew and stamped crudely around the sketches and the postcard to make a cover. On the left is my original, on the right is a simulation of what the cover would have looked like after copying it on a black and white machine at the office supply superstore. I don’t know if I even have a printed version of this issue in my archives, I probably just have the original. At that time, if my memory is correct, I used to print about 10-15 copies just to trade with people.
What do Ross Perot and Oceanic art have to do with each other? I had no idea then and don’t now, but one thing I have not ever grown out of is making collages out of random things. Now I call it Art Journaling and use it as one of my artistic outlets since I don’t really try to make “Fine Art” type art any more. It’s not that I don’t have plenty of ideas, I do, I just don’t see what good it would do for anybody. But I never know what older ideas I’m going to go back to!
Do you like adult coloring but don’t feel completely satisfied coloring someone else’s designs? Here is how you can use scrap papers and cardstock along with stencils to make custom homemade coloring books that reflect your own creative point of view.
What you will need:
Pencil
Scissors
Glue stick
Paper cutter
White or off-white card stock
Hole puncher
Black ball-point pen
Black Twin Tip Sharpie Permanent Marker – Fine/Ultra Fine
Tape
Bone folder or burnishing tool
Clean scrap paper
Metal ruler
Metal binding rings
Assorted found papers that relate to coloring (pictures from magazines, old books, catalogs, etc.)
Assorted black and white images on paper (scrapbooking papers, found images) Assorted stencils (hand-cut from your own designs, commercial crafting stencils, or a combination)
Instructions:
1. Cut out two pieces of cardstock 8 1/2 x 6 inches for covers. Select some found images that have to do with coloring and make collages on the front and back covers by gluing these images down with a glue stick. Put a clean piece of scrap paper over your collage and rub well with a bone folder or burnisher to make sure the papers are glued down flat.
2. Cut a bunch of 8 x 5 1/2 inch pieces out of white or off-white card stock or paper. I’ll walk you through using a combination of found papers and stencils to create black and white designs to color in later on these pages. It’s intimidating to have a bunch of blank pieces of paper staring you in the face, so to begin tear some papers with black and white designs or printing on them into strips using a metal ruler a guide. Glue some of these pieces on several of your blank pages in random places and directions.
3. Further build up your designs by using a variety of stencils to draw shapes randomly on your pages. Add black and white collaged images or textures to further enhance the pages.
Coloring pages are very appealing when you use different line weights to outline areas to color. I suggest you proceed by marking some areas with a heavier line first then progressively moving down in line weight as you add more detail.
A. Outline some areas from bold stencil designs using the “Fine” tip on the Sharpie marker.
B. Go back through your pages again and add more stencil designs outlined with the “Ultra Fine” tip on the Sharpie marker.
C. Go through the pages a third time and use yet more detailed stencils to draw on the pages with the black ball-point pen.
As you build your compositions, I suggest laying pairs of pages down on your work surface that will be opposite each other in your finished book. See if you get any ideas from how they look together. Here are some examples of pairs I made to complement each other.
4. If any of your pages are made of thin enough paper to let some of the marker lines bleed through, don’t get discouraged. Redraw the design in reverse on the other side of the paper to disguise the bleed-through and create some accidental compositions that could be very appealing and lots of fun to color.
5. Punch a top and bottom hole in the cover pieces and each page and connect with binding rings to make into a book. In order to get the holes to line up correctly, you can trace the holes in the first page you punch onto subsequent pages, or make yourself a template out of scrap chipboard.
6. Have fun coloring your pages. I like to use a combination of colored ball point pens, gel pens, markers and colored pencils. If you experiment with a lot of different media and practice you will develop your own style of mark making. If you would like some inspiration for coloring styles and techniques, I have examples on an Art Journaling Pinterest board that should help you out. The most important things to remember while coloring are to have fun and don’t let expectations of how your work is supposed to look be a damper on your creativity and expression.
My husband Tom and I each colored one of these pages.
Letterboxing logbook and samples of hand carved personal stamps.
I recently taught a two-part class to help people get started in the hobby of Letterboxing which combines outdoor exploration and creative expression. Two of the items you need to participate are a rubber stamp and a logbook. In part one, we hand carved a personal stamp and in part two we made a personal logbook. I wrote a tutorial for each class and they are now published on the Schnarr’s Hardware blog. If you want to try letterboxing or just learn to carve a rubber stamp and make a simple handmade book, here are links to my tutorials.
I make a lot of 6 x 6 inch pages for handmade journals. When you cut a 6 x 6 inch piece of paper out of an 8.5 x 11 piece of paper you’re left with a lot of leftover 8.5 x 5 inch pieces. Here is a project that will use up those extra pieces and possibly some of your other paper scraps as well. If you’re a regular reader of mine you know I try not to waste anything!
What you’ll need:
Text weight paper
Card stock
Decorative papers
Paper cutter
Glue stick
Self-healing cutting mat
Metal ruler Bone folder/burnishing tool
Clean scrap paper
Scissors
Double-sided tape
Awl or needle tool
Small hole punch Brads
Heavy thread or lightweight cord
Beads
1. Download the template Mini Album and print it out to use as a guide.
2. Cut out a piece of 8.5 x 4.75 inch card stock. Fold in half.
3. Out of decorative papers, cut 2 8.5 x 1 pieces and 4 4.75 x 1 pieces.
4. Fold one of the 4.75 x 1 inch pieces lengthwise and make a sharp crease with the bone folder. Flatten out and apply glue to the back. Glue down on the inside fold seam and burnish well (see A on template).
Glue paper piece to the inside fold seam.
5. Fold and glue two more 4.75 inch pieces to the edges (see B on template).
Fold two more pieces to the edges and glue down.
6. Fold and glue 8.5 x 1 inch pieces to top and bottom edges (see C on template). Burnish all well.
Glue two pieces lengthwise along top and bottom edges.
7. Fold another of the 4.75 x 1 inch pieces lengthwise and make a sharp crease with the bone folder. Flatten out and apply glue to the back. Glue down on the outside spine and burnish well (see A on template).
8. Cut out four pieces of 4.25 x 3.75 inch decorative paper. They can be all the same or all different. Glue to the front and back covers, inside and out. If you want to decorate the front cover further with more embellishments you can. Burnish all well.
Glue decorative papers to front and back covers.
9. Cut out front and back pocket pieces, fold in tabs and tape in place with double-sided tape.
Add pockets to inside covers.
10. Cut out twelve pieces of 8.25 x 4.75 text-weight paper. Fold all in half and nest pages. Use paper cutter to trim the paper that sticks out.
11. Using template as a guide for placement, punch four holes in the front cover with an awl, needle tool or small hole punch, and four holes in the back. Push brads in holes.
12. Using template as a guide, punch small holes in spine of paper and album cover with awl or needle tool.
13. Cut off a piece of cord that is about 28″ long. Thread the cord onto a needle and poke into the top first hole from the outside in, leaving about 7″ of cord trailing.
13. Run cord through the rest of the holes according to this sequence – second hole inside to out, third hole outside to in, fourth and bottom hole inside to out, third hole outside to in, second hole inside to out, then tie off. Add beads to cord if you want.
Cover of birding journal. Cover collage is made of found images, scrap papers and rubber stamped images from 7gypsies and Carolyn’s Stamp Store.
Here is a great handmade gift idea for someone in your life that loves to watch birds. A blank journal like my sample provides places for notes, sketches, photos, memorabilia and more. Here is how to make one.
First download my free template, Square 6×6 Journal. Print it out and use it as a guide.
Cut out two pieces of chipboard for covers. Make a collage of bird related images for the front cover. Cover edges of cover with decorative paper. Cover inside front cover, inside back cover and back cover with decorative paper.
To assemble front cover, cut out a piece of acetate and punch small holes. Punch small holes in front cover collage and attach to cover with brads. Make pockets and attach to both inside covers with double sided tape. Cut out a number of pieces of cardstock for inside pages. Embellish with brayered backgrounds, sponged backgrounds, decorative papers, Project Life cards and rubber stamps. Punch holes in all pages and covers and compile together with binding rings. Open rings and add new pages as needed.
Here are some sample page spreads to give you ideas for the interior pages.
A set of inside pages. On the left is a Project Life card and on the right are rubber stamps from 7gypsies and Carolyn’s Stamp Store. Patterned papers are from 7gypsies.
On the left is a cut-down Project Life card and on the right are rubber stamps from 7gypsies and Carolyn’s Stamp Store. Patterned paper is from 7gypsies.
On the left is a Project Life card and on the right are rubber stamps from 7gypsies and Carolyn’s Stamp Store. Patterned paper is from 7gypsies.
On the left is a Project Life card and on the right are rubber stamps from 7gypsies. Patterned paper is from 7gypsies.
On these two pages patterned paper is from 7gypsies and rubber stamps are from 7gypsies and Carolyn’s Stamp Store. The plain paper insert on the right is a piece of sketching paper – it’s good for drawing a sketch and it’s removable if you want to use watercolor or other media that is messy.
Stamps: Small word stamps are from Carolyn’s Stamp Store, other stamps are from 7gypsies.
Here are links to other products you can use for this project: