Tag Archives: image transfers

Art show opening this past Saturday

Today I am Dazzle Yellow and I have a lot to say!
“Today I am Dazzle Yellow and I have a lot to say!”

I appear to be in-between crises today so I’ll take a moment to write a little about art!

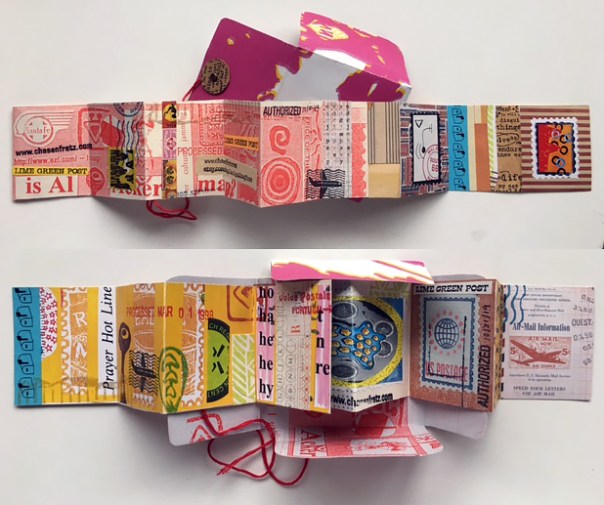
This past Saturday, October 1, 2022, was the opening reception for the Art Saint Louis show, “Declaration”. Above is my contribution to the show. It’s made of found papers, paint sample cards and image transfers from found papers made with packing tape. My artist statement reads as follows:

“When I started, I was inspired by some found images of rug designs from a catalog combined with some of my own mini postage stamp inspired collages juxtaposed with paint sample cards in tints of yellow. I work part time in a hardware store where exciting possibilities are everywhere. Bright paint sample cards, caution signs and caution tape and anything in the store that is colorful are parts of life I greatly enjoy. One of the colors on the sample cards was named Dazzle Yellow. I made some image transfers on packing tape out of sign images from a catalog and pieces of found papers that incorporate yellow, basically making my own version of caution tape. The purpose of such a bright yellow is to get attention. Once you have it, how do you use it? Yellow could mean stop and be careful, stop and enjoy, or “Look at me, I’m full of possibilities today!”

This was not an easy art show to look at, because as you might expect, a show with the theme “Declaration” is heavy on political themes. I had my share of political ideas for art pieces I considered making for this show but I decided to go in a different direction – I desperately need a break from politics and I figured art show patrons might like a little break as well! Whatever the subject matter, it’s always an honor to exhibit among a group of artists as talented as these.

I’m on the left posing with my collage and Dad is on the right next to a panel outside on the sidewalk that we were all allowed to add to with chalk markers. I’m very grateful to my Dad for coming with me – my husband Tom was busy at a homecoming event at his high school at the time of the opening and I certainly don’t begrudge him that! My Dad has been coming to my art events for decades and I’m eternally grateful for his support!

I custom made the frame for this piece at the last minute – I hadn’t done any woodworking since making a memorial box for the funeral of my uncle last year. Due to tragic events of last year I had been in such a brain fog that I didn’t trust myself with saws, mat knives and things until I was kind of forced into making this frame. That’s part of my motivation for entering these shows – it’s therapy for me both because of the opportunity for expression and because the deadlines force me to get things finished.

I have made so many picture frames in a similar style that even though it had been awhile, I had little trouble and was vastly relieved when it turned out ok! I had been intending to buy a frame because I thought I didn’t have enough time to work up to making one, but in the checkout line after looking in three stores for one the right size and shape I discovered that I had forgotten to pay my credit card bill and the charge would not go through. I immediately made a payment over the phone but it took a couple of days to re-activate so I was forced to hurry up and make the frame. I’m now glad that happened because now I have a lot more confidence and the next frame or wood project will be much easier.

Here are some helpful links with more information about the “Declaration” show:

My photos from the reception (plus one of me and my collage that my Dad took – click right arrow to see more)

Image gallery of all the works

Promotional video

Instructions for #12daysoftomsbeard

WHAT: If you have ordered something from my Etsy store recently, or if you get a Christmas card from me, you will find inside one or both of the following invitations for #12daysoftomsbeard.

Invitations with tags to decorate. Sometimes I include a little packet of paper ephemera to help people get ideas or inspiration, if they need it. If you want an invitation and did not get one in the mail, you can download one at this link – #12daysoftomsbeard tag invite.

These tags are intended for drawing on or decorating, then sending back to me, so that I can hang them on Tom’s beard each day from December 25 to January 6. During that time I will take a crazy picture of the results to put on social media for people to find when they search for the hashtag #12daysoftomsbeard. Last year Tom and I experimented with different lighting effects, backgrounds and filters to come up with something unusual each day. Last year I tried to group the beard art items, background and filters by color because bright colors usually go far toward cheering and inspiring me.

Here are some examples of tags I decorated last year, a couple that people sent in to me, and a few images that resulted.

WHY: We mostly like to do this because it’s a lot of fun, and it makes us laugh! You should have seen my MIL’s reaction when she saw the orange picture of Tom! “What have you done to my son!!!” We could do this without any participation from others, but we appreciate it whenever anyone wants to join in. It’s an extra creative challenge to use something someone else sent in, and it’s a way to connect with people who are sometimes separated by distance or who I don’t even know in “real life”.

Why do people paint rocks and leave them for others to find? Why do Jeep owners put rubber ducks on random other Jeeps? Why did I put a banana peel on my head earlier this year and have my picture taken with it on? Why did people in Toronto make a memorial display for a dead raccoon and share it on social media? Group activities and performance art projects are a satisfying activity for some reason, for quite a few people. I will probably write more later about the psychological reasons why that is the case.

Earlier this year I started a SWOT analysis of #12daysoftomsbeard to try to use some of what I learned in marketing class to try to increase participation this year. I didn’t finish the analysis yet, but I will keep adding onto it in the future as I finish sections. Here it is if you want to read what I have written so far – SWOT Analysis of #12daysoftomsbeard.

HOW – One idea I want to try for increasing participation is to provide some more specific instructions. The wording on the invitations reads: “To play, color, glue, punch, stamp or otherwise decorate this tag.” For some people, that will be enough guidance, others might feel comfortable with something more specific.

I am going to suggest techniques to try, and post examples here on this page. Watch this space as I add them! Since I like to use mixed media a lot, it will be a challenge for me to use just one technique at a time, so maybe I’ll try that. Enjoy!

Drawing

Coloring

Stenciling

Stickers

Hole punches

Design tape – also known as Washi tape or Paper tape

Collage

Rubber Stamping

Image Transfers

?????????? – What other techniques could be used?

Here are four examples of beard invitations I made for the 2022-23 season. They are meant to look a bit like chunks of hair that when assembled and applied to Tom’s face, will resemble a beard. I added a QR code to this web page so people could quickly find out what it is and what to do with it. Here are links to all six variations.

Beard Parts 1

Beard Parts 2

Beard Parts 3

Beard Parts 4

Beard Parts 5

Beard Parts 6

To participate, print out one or more of these sheets. Color or decorate the beard pieces with the designs and materials of your choice. Mail the pieces to Tom and I. Then check the hashtag #12daysoftomsbeard on Instagram between December 25 and January 6 each year to see what happens!

For more inspiration

Here is a link to a slideshow of images from the web page of IUOMA – The International Union of Mail Artists. I’ve been uploading the beard pictures to this gallery as I go. Intermixed are images that other people are uploading of conceptual art that they are both sending and receiving. This slide show changes daily as new images get added and older ones drop off. It might give you some ideas! Sometimes I put this slideshow on the screen while I’m working for extra inspiration!

Slide show of photos from IUOMA

Finishing Touches For Mini Accordion Books

Photo by Carien Van Hest. Both sides of the mini accordion book I sent her with it's two-sided envelope.
Photo by Carien Van Hest. Both sides of the mini accordion book I sent her with its two-sided envelope.

Back in 2019, I made a couple of square mini accordion books, 2″ x 2″ in size when folded up. While sending out my 2020 Christmas cards, I finally made envelopes for holding four of them and I sent them out to a few people in my Mail Art network. Here is an article I wrote about how I made that batch of little books – Made From Scraps: Mini Accordion Books.

In the spring of 2020, shortly after the pandemic started, my husband Tom and I started hosting a #virtualartparty online for several weeks in a row to help ourselves and people we know cope with loneliness and anxiety. During the second session, I demonstrated how to make these little accordion books since they can be made from scraps and supplies many people already have around the house. At the end of this article is the archived video of that accordion book session. I started two books that afternoon, which I finally finished recently.

The image below shows the first book, titled “The Wonder of Life”. The top two images are of each side semi-folded. Below that are some close-ups of different sections of the book. To make these mixed media collage compositions, I combined found paper scraps, rubber stamping, design tape, stencils, marker drawing, and image transfers made from clear packing tape. Here is an article I wrote about how to make the image transfers – Art Journaling With Stencils and Image Transfers.

mini_book_wonder_of_life
Mini book by Carolyn Hasenfratz Winkelmann called “The Wonder of Life”.

The next image below shows several examples of image transfers I was making next to sections of the stretched out accordion books that I was trying to coordinate with. I knew I would not know exactly how the semi-translucent transfers would look when they were laid over the underlying paper collage, but to make sure they were at least somewhat harmonious I looked for images for my transfers that reflected the colors and shapes of images I used in my first layer.

Coordinating transfer images to lay over collaged images.

I made a template for an envelope to fit the books or any thin 2″ x 2″ object for people to download and use to make an envelope for their book if they so wished.

Mini Book Envelope Template

I used the above template to trace two envelopes onto cardstock. I cut the envelopes out and made folds where the dotted lines are in the template so that the envelopes would be thick enough for the little books. With a circle punch I cut little circles to use for making a string closure. I made extras knowing I was going to put transfers on these circles – I wanted to be able to choose from several to get ones that looked good with the finished envelopes.


cutting_and_folding_covers

My next step was to paint the fronts and backs of each envelope with clear acrylic medium, letting the medium dry before I flipped them over to coat the other side. This step was for three purposes – to increase durability, to reduce wrinkling when I later applied layers of transfers and paper, and to make the paper more receptive to the slick tape transfers. When all was dry, I applied transfers to the outsides of the envelopes using clear medium as the glue and burnished them well to remove any air bubbles. After they were dry I trimmed the transfers to the edges of the envelopes.

Applying tape transfers to cardstock envelope.

folding_covers
Envelopes after trimming.

For the insides of the envelopes, I used the acrylic medium to laminate a pieces of paper with a matte finish to the insides of the envelopes. I wanted a matte finish for the insides instead of a shiny finish so that the envelopes would not stick to the books when stored.

The final steps in finishing the book covers were to attach the small cutout discs I made earlier with small brads, and wind embroidery thread around the discs to make a string closure.

Below is the other book I made, “The Wonder of Creativity”. Both books are for sale here on Etsy: https://www.etsy.com/listing/977853529/mini-artist-books-collage-and-mixed?ref=shop_home_active_1&frs=1

mini_book_wonder_of_creativity
Mini book by Carolyn Hasenfratz Winkelmann called “The Wonder of Creativity”.

Helpful links for Virtual Art Party #2: Mini Accordion Books, for further exploration into different ways of making handmade books.

Virtual Art Party!

Our kitchen table set up for art fun

I’m trying something new today. I’m hosting a virtual art party on Facebook! It will be at 4:00 pm, Central Standard Time.

How to join:

1. If you are interested in doing some coloring, I have some free coloring pages you can download here:
https://www.facebook.com/carolyn.hasenfratz/media_set?set=a.10222335620243630&type=3

2. Otherwise, get a project you want to work on ready to go at your location.

3. Go to the Facebook event page at 4:00 pm for live video.
https://www.facebook.com/events/1308272826032176/

4. If a chat starts, join in!

5. Upload pictures of what you are making.

Here is a video replay!


Here are some links to things that came up during the video conversation:

Art Journaling With Stencils and Image Transfers – tutorial on how I made the clear collaged bits for my art journals

Book Review: “My Crazy Life Stories from A to Z” by Marilyn Linkul Winka – my review of my Aunt’s book

Fun With Food – my food page, included the roasted vegetables recipe Marilyn talked about

“Back To Our Roots” Art Show – the recent art show that I dedicated to my late friend Mark Reed

Art Journal Selections – my commentary on art journal pages that were in the recent show

Seeing Ourselves – my recent artwork for the Diversity Conference

Photo of Oz and I at Garden of The Gods with late friend from SIUE Gary


Ideas for some art to make perhaps? This is a great idea!

window_scavenger_hunt

My next class at Schnarr’s Hardware is Image Transfers on Wood Jewelry

 Image Transfers on Wood Jewelry
Class by Carolyn Hasenfratz Winkelmann – Image Transfers on Wood Jewelry

Date:
April 25, 2019

Time:
5:30-7:30 PM

Place:
Schnarr’s Hardware, 40 East Lockwood, Webster Groves, MO 63119

I’m teaching this class again for the first time in three years! Make amazing lightweight pendants by transferring found images onto wood. You will be supplied with the materials to make a necklace for wearing your interchangeable pendants. You will learn the basics of transferring images with tape and gel medium and attaching a clasp to a cord necklace. I will have a selection of transferred images on hand for you to use at the beginning of the class, then while your pendant or pendants are drying, I’ll show you two different techniques for converting found images into beautiful embellishments to add to wood pendants and other art and craft items.

Each class attendee will receive a printout with a written tutorial for that class so if you forget anything we learned you can refer back to it later. Jewelry tools will be available to borrow during the class and some tools and supplies will be available to purchase if you want to continue working on your own.

At each class, there will be at least one door prize randomly awarded to an attendee – probably a craft supply item of some type that relates to the theme of the class. Past prizes have included a necklace kit, a polymer clay frame kit and a craft stencil. That’s my way of saying thank you for coming!

What to Bring
It’s not necessary to bring anything but it’s a good idea to wear old clothes in case there is a glue mishap. If you have found images on glossy papers like magazine or catalog cutouts, or laser printed copies, you can bring those as a source for images.

What’s Provided
I will provide wood pendant blanks, gel medium, images, packing tape, findings and parts for at least one necklace. I will have tools to borrow during class.

Only 20.00 per person!

LINK TO GET TICKETS:
https://dabble.co/rc/carolyn-hasenfratz-winkelmann

Art Journaling With Stencils and Image Transfers

Art Journaling With Stencils and Image Transfers

Last fall during the Old Webster Fall Art Walk, I demonstrated making pages for an art journal with paper collage work and stencils at Schnarr’s Hardware. I added in some paint samples to pay tribute to the hardware store atmosphere and remind me to have fun with colors. Later on I added some image transfers I made with clear packing tape. Learn how to make image transfers and add them to your art journal pages on the Schnarr’s blog:

Art Journaling With Stencils and Image Transfers