Sometimes when I’m stuck for ideas I’ll make a themed collage out of rubber stamped images combined with other images on paper scraps. My approach is more like an all-over pattern in the manner of a fabric print or wrapping paper rather than a fine art collage with a focal point. This all-over pattern collage is easy and I can almost do it on autopilot. When the collage is finished I usually get inspired with ideas for how to use it. If not, I scan it, put it in a folder, and I know it will be there for later when I need it.
To begin select some stamps that fit a theme of your choice and stamp them in black ink on different colors of paper.
Stamp credits: Art strip CarolynHDesign, paintbrush by Stampa Rosa, Art from Dream Slab by Postmodern Design, paint tube by Tin Can Mail, Art Capital A by Hampton Art Stamps, Limbert’s Arts and Crafts stamp unknown.
Tear out the images you just stamped into small pieces, then do the same to some decorative paper and found images from your stash. To go with my art and art tools theme, I picked some black and white papers.
Black and white decorative papers by CanvasCorp.
I start gluing down paper pieces in the middle of a piece of backing paper, then work my way gradually out to the edge.
There are usually a few gaps left here and there after the paper is nearly full, so I cut or tear some pieces to size to fill in the last few spots.
I usually end up cutting the resulting collage into smaller pieces to use in paper crafting projects such as cards. But before I do that I scan the image so I have a digital file of it that I can use in graphic design projects.
Try inverting the colors in some graphic editing software such as Photoshop for unexpected color combinations.
After inverting, I slid the HSB (Hue Saturation Brightness) tool to get additional fresh color combinations. I stopped on this, my favorite, to export a sample I want to use right away. I think after this article goes live I will use it for awhile as a Facebook cover graphic.
Here are some crafted and digital projects I’ve made in the past that make use of themed collages using the same process.
Rubber stamped paper frame around a collage on an art journal page.I made the collage based on an activity prompt by Somerset Studio Magazine. The stencils for the collage are by The Crafter’s Worshop and Tim Holtz. The rubber stamps in black making up the frame are of my own design. The background paper is by p13.
I made this rubber stamped paper frame for an art journal page. You can make one like it for that purpose or other projects such as scrapbooks, greeting cards, photo displays and more.
When I placed my collage on this piece of decorative paper for my art journal, I thought it needed a little more so I decided to make a frame for it. I used tracing paper to draw out the size and shape I wanted. Then I transferred my drawing to scrap card stock and cut a template to use for tracing.
I traced around and cut out four frame pieces.
I wanted black and near-white rubber stamped images to glue to the frames, so I got a bunch of stamps out that are of my own design and stamped them in black stamping ink on cream color card stock. Some of these stamp designs are available in my Etsy shop, and some only exist as hand carved stamps.
Tearing the stamped cardstock into strips for making smaller mosaic pieces
I tore the stamped images into small pieces, and glued them to the frames.
After trimming the frames were done and ready to mount in my art journal.
Do you have a summer event coming up that could incorporate a garden theme? If so, here is an idea for combining my last two published projects, Make a Seed Packet Bouquet and Make Gift Tags Into Recycled Greeting Cards. Presented in a terra cotta plant pot, these “bouquets” could be a garden themed gift, party favor or table decoration. I made these samples because I needed Mother’s Day gifts in a hurry, but variations could be made for garden parties, weddings, tea parties, picnics and more.
In my project Make a Seed Packet Bouquet, I experimented with different embellishments for the corners of the seed packet holders. For this group I punched out a whole bunch of circles with a circle craft punch. Then I stamped a flower stamp on many pieces of colorful scrap paper. I cut the flowers out then glued each to a circle.
Flower stamp credt: 7Gypsies.
I then used the circles on the corners of the seed packet holders by punching a hole in the middle and attaching them with metal brads.
Stamp credits: Flower inside circle, realistic butterflies, bird egg, “Crazy Love” by7Gypsies. “Seeds”, brackets, “love” by CarolynHDesign. “Celebrate” by Making Memories. Scribble flowers and butterfly by Fiskars.
I selected two tags for each seed packet assembly, one smaller and decorative and the other larger and functional with “To” and “From” on the back.
I went to Schnarr’s Hardware to buy terra cotta plant pots and packets of lettuce seeds, then to JoAnn Fabrics and Crafts to buy a bag of natural moss. You can buy florists foam to stick the skewers into, but I had some chunks of scrap styrfoam on hand so I cut them apart with a hand miter saw and stuck a piece in each plant pot.
I wrapped each pot with tissue paper gift wrap that I had on hand, then placed some of the moss on top. I pushed each skewer in through the moss and tissue into the foam, then tied the tags around each “stem” with twine.
How did I decide which seeds to include? I chose a lettuce mix because it can be grown in a small container and harvested as micro greens. I bought two packets and divided the seeds up among the five smaller packets that I made. In order that the recipients would know what the seeds are and how to grow them, I scanned information from the back of the packet into the computer and used graphics software to make this graphic, which I then printed out.
These graphics came from the back of the Botanical Interests brand seed packets that I purchased.
After printing the above graphic I cut out the informational graphics out and glued one to the back of each homemade seed packet.
This project is adaptable to many varieties of seeds and many different themes. I hope you enjoy the ideas!
Two ways of making gift tags from paper scraps and free downloadable files that I’ve prepared. Rubber stamp credits for left image: “Love” and tiny heart by CarolynHDesign, butterfly and notebook texture by 7Gypsies, “celebrate” by Making Memories. Right image: “You are loved”, flower and butterfly by Fiskars, decorative border by CarolynHDesign.
Here is another entry in a series of articles I’m working on about things you can make from old greeting cards and paper scraps. Tags are a useful thing to make and keep on hand for gift giving and gift presentation. Great presentation is one of the best parts of getting a gift – some thought and care makes a gift personal and special.
Download and print out the template Gift Tags Set 1. Loosely cut out the tag shapes from the template and with the glue stick glue them down to the backs of parts of old greeting cards. Burnish well with a bone folder for a tight seal. To keep surfaces clean and to prevent ink and toner from getting onto surfaces, place the pieces you burnish between two pieces of clean scrap paper.
Trim around the outer edge of the tags to cut out. Now you have a tag with To: and From: printed on one side and a design or a plain color on the other, depending on what was on the recycled card.
After trimming. Some of the tags are interesting as they are. Most will need some more decoration.
Add strips of decorative paper to the sides of the the tags that need more decoration.
Give the edges of both sides of the tags a decorative treatment, with rubber stamps and/or paint markers.
Now they are done and you can write them out and tie them to the package with ribbon or twine.
Instructions – Method 2
Cut a bunch of tag shapes out of scrap cardstock and greeting card parts. If you think you will make a lot of tags, you might find it helpful to make yourself a set of templates for tracing tag shapes out of scrap chipboard or other thick paper scraps.
Here are tag templates I made for myself. Whenever I want to make tags, I trace around these onto scrap cardstock and old greeting cards. That gives me a supply of bases for adding embellishments.
Tear the To and From sections out, using a straight edge like a metal ruler as a guide.
Glue the To and From sections torn from the printed paper onto the backs of the tags.
Add decorative paper scraps around the To and From and trim with a scissors.
Decorate the other side of the tag if needed.
Stamping can be kind of time-consuming. A good shortcut to try when adding visual textureand interest is to stamp the edges of several tags at once by placing them next to each other on the work surface.If either side of the tags looked too bare, I added rubber stamp markings where I thought they were needed.Here are some tags with a Christmas theme.
Here is a new and improved and combined version of a couple of tutorials I wrote in 2016. Enjoy!
Tools and Materials
Seeds, either purchased or home harvested Template for a 2.5 x 3.5 inch envelope, and Seed packet holder template for 2.5 x 3.5″ packet Decorative paper Cardstock Squeegee tool or bone folder Glue stick Scrap cardstock, chipboard, or file folders for backing templates for tracing Clean scrap paper for gluing surface Rubber stamps Stamping ink Punches, stencils or templates for flower, center hole of flower, and leaf. Scissors Cutting mat X-acto or craft knife Metal ruler Pencil Double-sided tape Small hole punch Wood skewers (available in grocery stores) Tape Decorative paper flowers Needle tool or awl – if using brads to attach embellishments Brads Adhesive dots Glue for attaching embellishments Small floral theme embellishments
Instructions
First make the seed packets.
Template for Seed Packet Envelope Small
Download and print out the Seed Packet Template Small. Cut out the template and glue it to scrap chipboard or cardstock for durability with a glue stick. Trim around it with scissors.
Stamping on plain paper. Stamp credits from left to right: handwrting background stamp by Inkadinkado, newsprint by Posh Impressions, Da Vinci frontispiece might be Stampington, Pennsylvania Dutch Border Rubber Stamp by me, and arts and crafts botanical tile pattern at the far right by me.
Take some plain paper or decorative paper with a subtle pattern on it and stamp some background stamps on it in complementary ink colors to make it more interesting. If your paper is interesting enough without this step you can skip it.
I own a lot of rubber stamping ink pads, but I don’t have one for every re-inker in my studio. If you want to save money and/or space, you can just buy a re-inker instead of a pad and apply the ink to a palette with a brayer. Then you can roll the ink onto the stamp, or for small stamps just press it on the inked palette. This works best when you want to do a lot of stamping with the same color – when you only want to do a little bit of stamping a pad is much more convenient. When you’re done stamping, if there is any ink left on the palette you can sprinkle a little water on it, lay down a piece of plain paper and burnish it. It’s a fun way to make interesting backgrounds. You can even draw or stamp or make marks into the ink to do a form of monoprinting. When I first took printmaking class, I got into what I could do with the palette at least as much as the printing blocks that I carved.The picture shows a piece of plexiglass as a palette, I’ve also used at various time palette paper, waxed paper, and the shiny side of freezer paper.
Place decorative paper back side up on your work surface. Place the Seed Packet Template Small that you printed out on the paper and trace around with pencil. Cut out envelope and fold in tabs. A thin ruler or straight edge is a good helper for making folds. Go over the folds with a squeegee tool or bone folder.
Envelpoes cut out before they are folded
With a glue stick, glue all the tabs on the envelope except the top tab. Leave that one open so you can add seeds later.
Fronts and back of assembled envelopes.
Once the envelope is assembled, if the front looks a little plain add some texture stamping along an edge or two. That’s really effective for adding interest.
I added stamping to the edges with some favorite texture stamps.The notebook page border stamp is by 7Gypsies, and the texture at the upper right is by Judikins.
Cut out a narrow strip of paper with a decorative scissors and stamp on it the word “Seeds” surrounded by small brackets. If you don’t have similar stamps in your collection you can use whatever stamps you have that fit the theme. Accent the strip with rubber stamping in lighter colors along the edges.
The Seeds stamp and the brackets are both from my own collection.
Glue the strip across the top of the envelope about a quarter of the way down or whatever looks right to your eye. Trim the ends after gluing if needed.
I glued on the strip that says “Seeds”, trimmed the strips to the edges of the envelopes, and got flower and leaf pieces in place to glue on.
Punch out a flower shaped piece of decorative paper and punch out a paper circle for the middle. Glue circle on flower and glue flower to the front of the envelope. An alternate idea is to cut out a leaf shape and a stem piece to make a leaf design for the front. I used a commercial punch for the flower and a pattern from a paper stack for the leaf. You can use whatever patterns and punches you have that you like if you don’t have these exact designs.
Stamp large brackets around the flower. I used unmounted bracket stamps, so the clear block you see is an acrylic block for temporarily mounting stamps with double sided tape or adhesive bits.
Pictured upper left: bracket stamps on an acrylic block. Upper right: stamping on a seed packet. Even though the clear acrylic block is a bit smudged from use you can still see through it to see where to stamp. The brackets stamps are temporarily attached with adhesive squares. Bottom: Finished seed packets.
Fill the packet with seeds, and write the name of the seeds and if you like growing information on the back of the envelope. You can obtain seeds by buying them in a garden center. This is also a charming way to package seeds you’ve harvested yourself to make a special and personal handmade gift for someone.
Next are holders for the packets
Next make holders so you can suspend the finished seed packets on skewer sticks to display them in a container of some kind. Perhaps a vase as in my example, or maybe a table centerpiece, a gift basket, a plant pot with garden tools or some other special container.
Download the template Seed Packet Holder Template for 2.5″ packet x 3.5″. You might only need to look at it for reference, but if it’s helpful as a cutting guide, cut out and mount the parts on scrap chipboard for durability.
Cut out a piece of card stock of a color that is harmonious with your seed packet, 3.5 x 9 inches. Fold it in half.
Lay the holder piece flat and unfolded on your cutting mat. Cut four diagonal slits through the front of the seed packet holder toward the corners using a craft knife and a metal ruler as a guide.
Punch small holes where indicated on the back of the seed packet.
Push a wooden skewer through the back of the holder so that the blunt end of the skewer ends up inside the holder butted up against the fold. Tape in place.
Slip your seed packet into the front of the holder.
Take four small flower embellishments in colors that go well with your seed packet and attach them to the corners. Depending on what kind of embellishement it is, you could use glue, adhesive dots or brads to attach.
Put double sided tape or adhesive dots along the sides and bottom inside your holder. Fold the front down and press halves together.
Arrange your packets in a vase or other container. You’re done!
“From the heart” – finished Christmas themed explosion cards. Pictured closed at the top of the picture, open at the bottom.
What is an Explosion Card? It’s a card that allows the recipient to open a folding portion of it and see something come out or appear. Sometimes people put in confetti or glitter. I’m only putting in a dozen punched-out paper hearts in each – they won’t make TOO much of a mess when opened!
This project is the result of old paper crafting templates I downloaded long ago, combined with brainstoming for ways to re-use old greeting cards, Christmas cards in this case. The folding assembly on the front of the card is very simple as far as explosion cards go, but since this card has a lot of parts and uses a lot of different materials, I didn’t want to make it too complicated. When you’re using upcycled paper scraps in a project, a simple design is a good foil for a potpourri of designs and motifs that might otherwise be too busy visually.
Tools and Materials
Templates: Explosion Card Page 1, Explosion Card Page 2, and if you want to make an envelope, Envelope Template Square. Cardstock Assorted decorative papers, new or upcycled, in coordinating colors and themes Bone folder or squeegee tool Ruler Pencil Clean scrap paper for work surface Scrap cardstock or chipboard for making templates for tracing Embossing fluid or metallic slow-drying pigment ink Heat tool Gold embossing powder Optional – large opalescent glitter Long thin plain rectangle rubber stamp or cut down piece of a white plastic eraser Old food lid to use as a palette for ink and paint Paper cutter Scissors Glue sticks Adhesive dots Old greeting cards Heart punch Eraser with flat sides, dedicated for printing Paint pens Acrylic paint and acrylic medium Permanent black or dark color rubber stamping ink Rubber stamps with a sentiment and small words
Instructions
Download and print out the templates Explosion Card Page 1 and Explosion Card Page 2. Keep Page 1 intact for reference. The diagram on Page 1 will tell you what size cardstock to cut out to make the card, and show you where to adhere items to the front of the card. Take Page 2 and cut out the three shapes. Glue them to scrap cardstock or chipboard with a glue stick and trim to make re-usable shapes for tracing.
Here are the three shapes from Page 2, mounted and cut out on old manila file folder scraps.
Next choose cardstock to make the card body. Cut out an 8.5 inch by 4.25 inch piece and fold it in half.
Place the tracing template 3″ x 3″ square in the middle of the front of the card and trace around it with pencil.
Here is a green piece of cardstock, 8.5 inch by 4.25 inch, folded in half. I used the 3 inch square template I just made to trace a square in pencil onto the front of the card as a guide to where to stamp the embossing ink.Rubber stamping a thin strip of gold pigment ink then applying embossing powder to make a nice gold frame for the front of the card.
Stamp on top of the pencil line with either embossing ink or metallic pigment ink that stays wet. As shown in my example I had had some leftover gold pigment rubber stamping ink so I used that instead of embossing ink. Embossing ink is made to dry slowly on purpose so that embossing powder will adhere to it until melted with a heat tool. Pigment rubber stamping ink will also stay wet for a long time so if the application is juicy enough you can use it for embossing.
I stamp long thin rectangles on a lot of my projects to make edging, frames, or lines of various widths. I keep erasers and scrap rubber strips around for this purpose to apply various inks and paints. You can also use strips cut from foam, or as shown in the photo above you can use a rubber shape stamp. The one shown is from my set Faux Postage Shapes. Some commerical stamps that are just plain shapes are sold for when you need solid colors or background colors. Sometimes they are called shadow stamps. It’s also easy to make your own shadow stamps from foam or sheets of rubber you can buy in the plumbing department at the hardware store, normally used for cutting gaskets. Here is a link to an article I wrote that involves printing with foam – a fun pursuit in itself!
Sprinkle gold embossing powder over the wet ink, shake off the excess, and melt with a heat tool. Here is a tip – if you have large-grained opalescent glitter, mix in a little bit of that into the gold embossing powder before you sprinkle it on. As long as you don’t overheat the embossing powder, the glitter won’t melt and it adds extra texture and interest to the gold area.
The first batch of these cards I made used all tints and shades of green. I decided that the green was a little flat looking and needed more interest. I looked through my rubber stamp collection to see if there was a border stamp that might make a translucent texture but none of them grabbed me at the moment so I decided to mix some matte acrylic medium with a bit of yellow acrylic paint and stamp it along the edges of the card with an eraser. The texture of the stamped paint was just what I was looking for. It made the green more interesting without giving it a flat look that was too opaque.
You can let the paint dry naturally or hurry it along with a heat tool, making sure not to re-melt the embossing powder. Now you have a subtle but interesting ground for stamping some words and phrases around the edges. I picked a Tim Holtz stamp “from the heart” for the bottom edge of my cards, and the words “hope”, “peace” and “joy” from my set Christmas Card Making Kit. You can use any stamps in your collection that fit the space and your theme. I used permanent ink so it would stamp ok on the paint, but if you skip the paint you can use any ink you have that suits your cardstock surface.
After embossing, stamp paint along the edges if needed, and words and phrases with permanent rubber stamping ink such as StazOn.
The next step is to go looking for parts of greeting cards to cut out and make into parts of new cards. To make these samples I was looking for three things – first a sentiment to cut out and glue into the inside of the card, where the sentiment usually is. Second, a piece to use as the inside front, which is a square with rounded corners. Third I looked for colorful card pieces to punch hearts from to fill the “exploding” container at the front of the card.
Every card I made didn’t need this, but there were a few pieces of cardstock I used which turned out to be too flimsy to fully support the finished card so I backed the cardstock where needed with portions of cards with nice designs on them, laminated together with a glue stick.
I used parts of cut up cards to line the inside front of some of the cards, and each card had a sentiment inside that I got from an upcycled card.
I used a lot of cut-out sentiments from from the insides of cards to glue in the traditional spots inside my new cards, leaving room underneath for signing the cards.
Then I selected parts of cards to put inside the front folded in assembly that you’ll see how to make soon. I traced around the “inside front” template with pencil or pen then I cut them out. I used both words and images, whatever looked right and fit the theme.
In the middle is the tracing template I made from the download Explosion Card Page 2. Selections both before and after cutting show what might work glued down inside the “explosion” front of the card. Here are some images that I might use for Easter, a new house card, or a Valentine.
With what scraps were left over from cutting parts out of the cards, I used a heart punch by Marvy Uchida to punch hearts out. I supplemented these scraps with other found papers and cardstock to make sure I had enough hearts for all the cards I made. I put the hearts aside for later.
Punching out some hearts from parts of old cards.
The next step is to make the “Assembly for front” as labeled on the template you made. Take the template and trace it in pencil on a piece of solid color card stock that fits your chosen color scheme. Cut it out and fold the semicircle tabs in. A ruler and bone folder are good aids to making nice crisp folds.
When the “exploding” part is folded shut, the decorative paper on the outsides of the flaps will show.
Now on the outside of each tab, the side that will show when the tabs are folded in, glue a piece of patterned or decorative paper. Gift wrap and decorative scrapbooking papers are great choices for this part. After gluing down the decorative paper, trim with a scissors.
Next use adhesive dots to fasten the folding assembly to the front middle of each card, right in the middle of the gold embossed outlined square. Adhesive dots are stronger than double sided tape and less messy than glue, though you could also try those if you don’t have adhesive dots. Burnish well with a bone folder so they really stick.
Outline your rounded rectangle pieces for the inside fronts with a coordinating paint marker. When the marker is dry, adhere to the inside front with adhesive dots.
Fill the container with as many hearts as you like and fold in the tabs in order, one by one until it’s closed. Now when the recipient opens it the hearts will fall out.
If you want to make an envelope to match, you can use the template Envelope Template Square as a guide.
Finished cards made by cutting up old Christmas cards
I’ve been working on a series of projects designed to challenge myself to see how many different ways I could upcycle old holiday cards. Usually there is a nice picture on the front, and a sentiment on the inside. Here is how to make a new card out of an old one by recycling the re-usable parts and adding a bit of your own creativity with a little metallic paint, glitter, and rubber stamping ink.
Templates for two sizes of rectangular greeting cards. This image is smaller than actual size. To download the originals, click on Small Rectangular Card #1 (5.25 x 4 inches) or Small Rectangular Card #2 (3.5 x 2.75 inches).
Download and print out one or both the two card templates, Small Rectangular Card #1 or Small Rectangular Card #2. They will help you visualize what size parts to prepare and how to put them together.
Go through some old holiday cards and cut the pictures out of the front of the card, either the 3.5 x 4.75 inch size or the 3.5 x 2.75 inch size. It’s very efficient to make several at a time.
I added metallic paint to the edges of some of my cut out images, and glitter to others. An easy way to apply paint to a straight edge is to squirt some paint onto an old food lid, or other temporary palette. Cover your work surface with scrap paper. Take an eraser with flat sides and sharp edges and dip it in the paint. Stamp a straight line of paint onto the edges of the images. I reserve an eraser for this use because I use this manner of application a lot for acrylic paint and various inks.
While the paint is drying, you might like to edge more of the images with glitter. Squeeze or brush glue around the edge, then apply the glitter and let dry. I made selections from my own glitter stash more interesting by mixing sizes and shapes of glitter particles and adding at least one opalescent color to each blend.
Glitter blends that I mixed up for a variety of Christmas projects.
If you ever need to speed up the drying of paint or glue at any stage for easier handling, you can dry the pieces with a crafting heat tool.
Cut out images edged with metallic paint and glitter.
For each image, cut a piece of cardstock in the size of an unfolded card, and fold it in half. Using a self-healing cutting mat, a utility knife, and a metal ruler, cut a slit in each corner as indicated on the template. It isn’t necessary to draw the lines on the card before cutting – as long as the cuts are close to the right size and placement they should work.
Next insert the images into the fronts of the folded cards by tucking the corners into the slits.
Stamping the corners.
I thought the corners needed to have a bit more interest to them, so I stamped each corner in a mix of acrylic medium with a touch of metallic paint and glitter to add a little shimmer. Then when that addition was dry, I over stamped some decorative stamp dessigns in black permanent ink.
Gluing a sentiment into the inside of each card that I cut from another card.
The last step to finish the cards was to glue a sentiment that I cut from another card into the inside of the card with a glue stick.
Front cover and an activity page from “Fun Till Christmas” by Janet and Alex D’Amato, published in 1965.
Pictured just above are the front cover and one of the activity pages from a book that I had when I was young. I bought a barely used or written in copy at the St. Catherine Laboure garage sale this past spring. The copy I had when I was a kid is long gone and by the time I was done with it, it was all cut up and torn up and written in. I obsessed over every inch of that book. It was a huge influence on me. I loved the activities and graphics. Many of the projects involved creative re-use, like making things out of old Christmas cards. I’ve enjoyed upcycling cards for a long time. I’d like to share with you some of the creative re-use projects I’ve been enjoying. Of course if you don’t celebrate Christmas, the theme of this project could be adjusted for any occasion that involves cards.
Today I’ll show you Christmas Mini Cards With Envelopes.
Mini cards and envelopes made from recycled Christmas cards, envelopes, and wrapping paper.
Tools and Materials
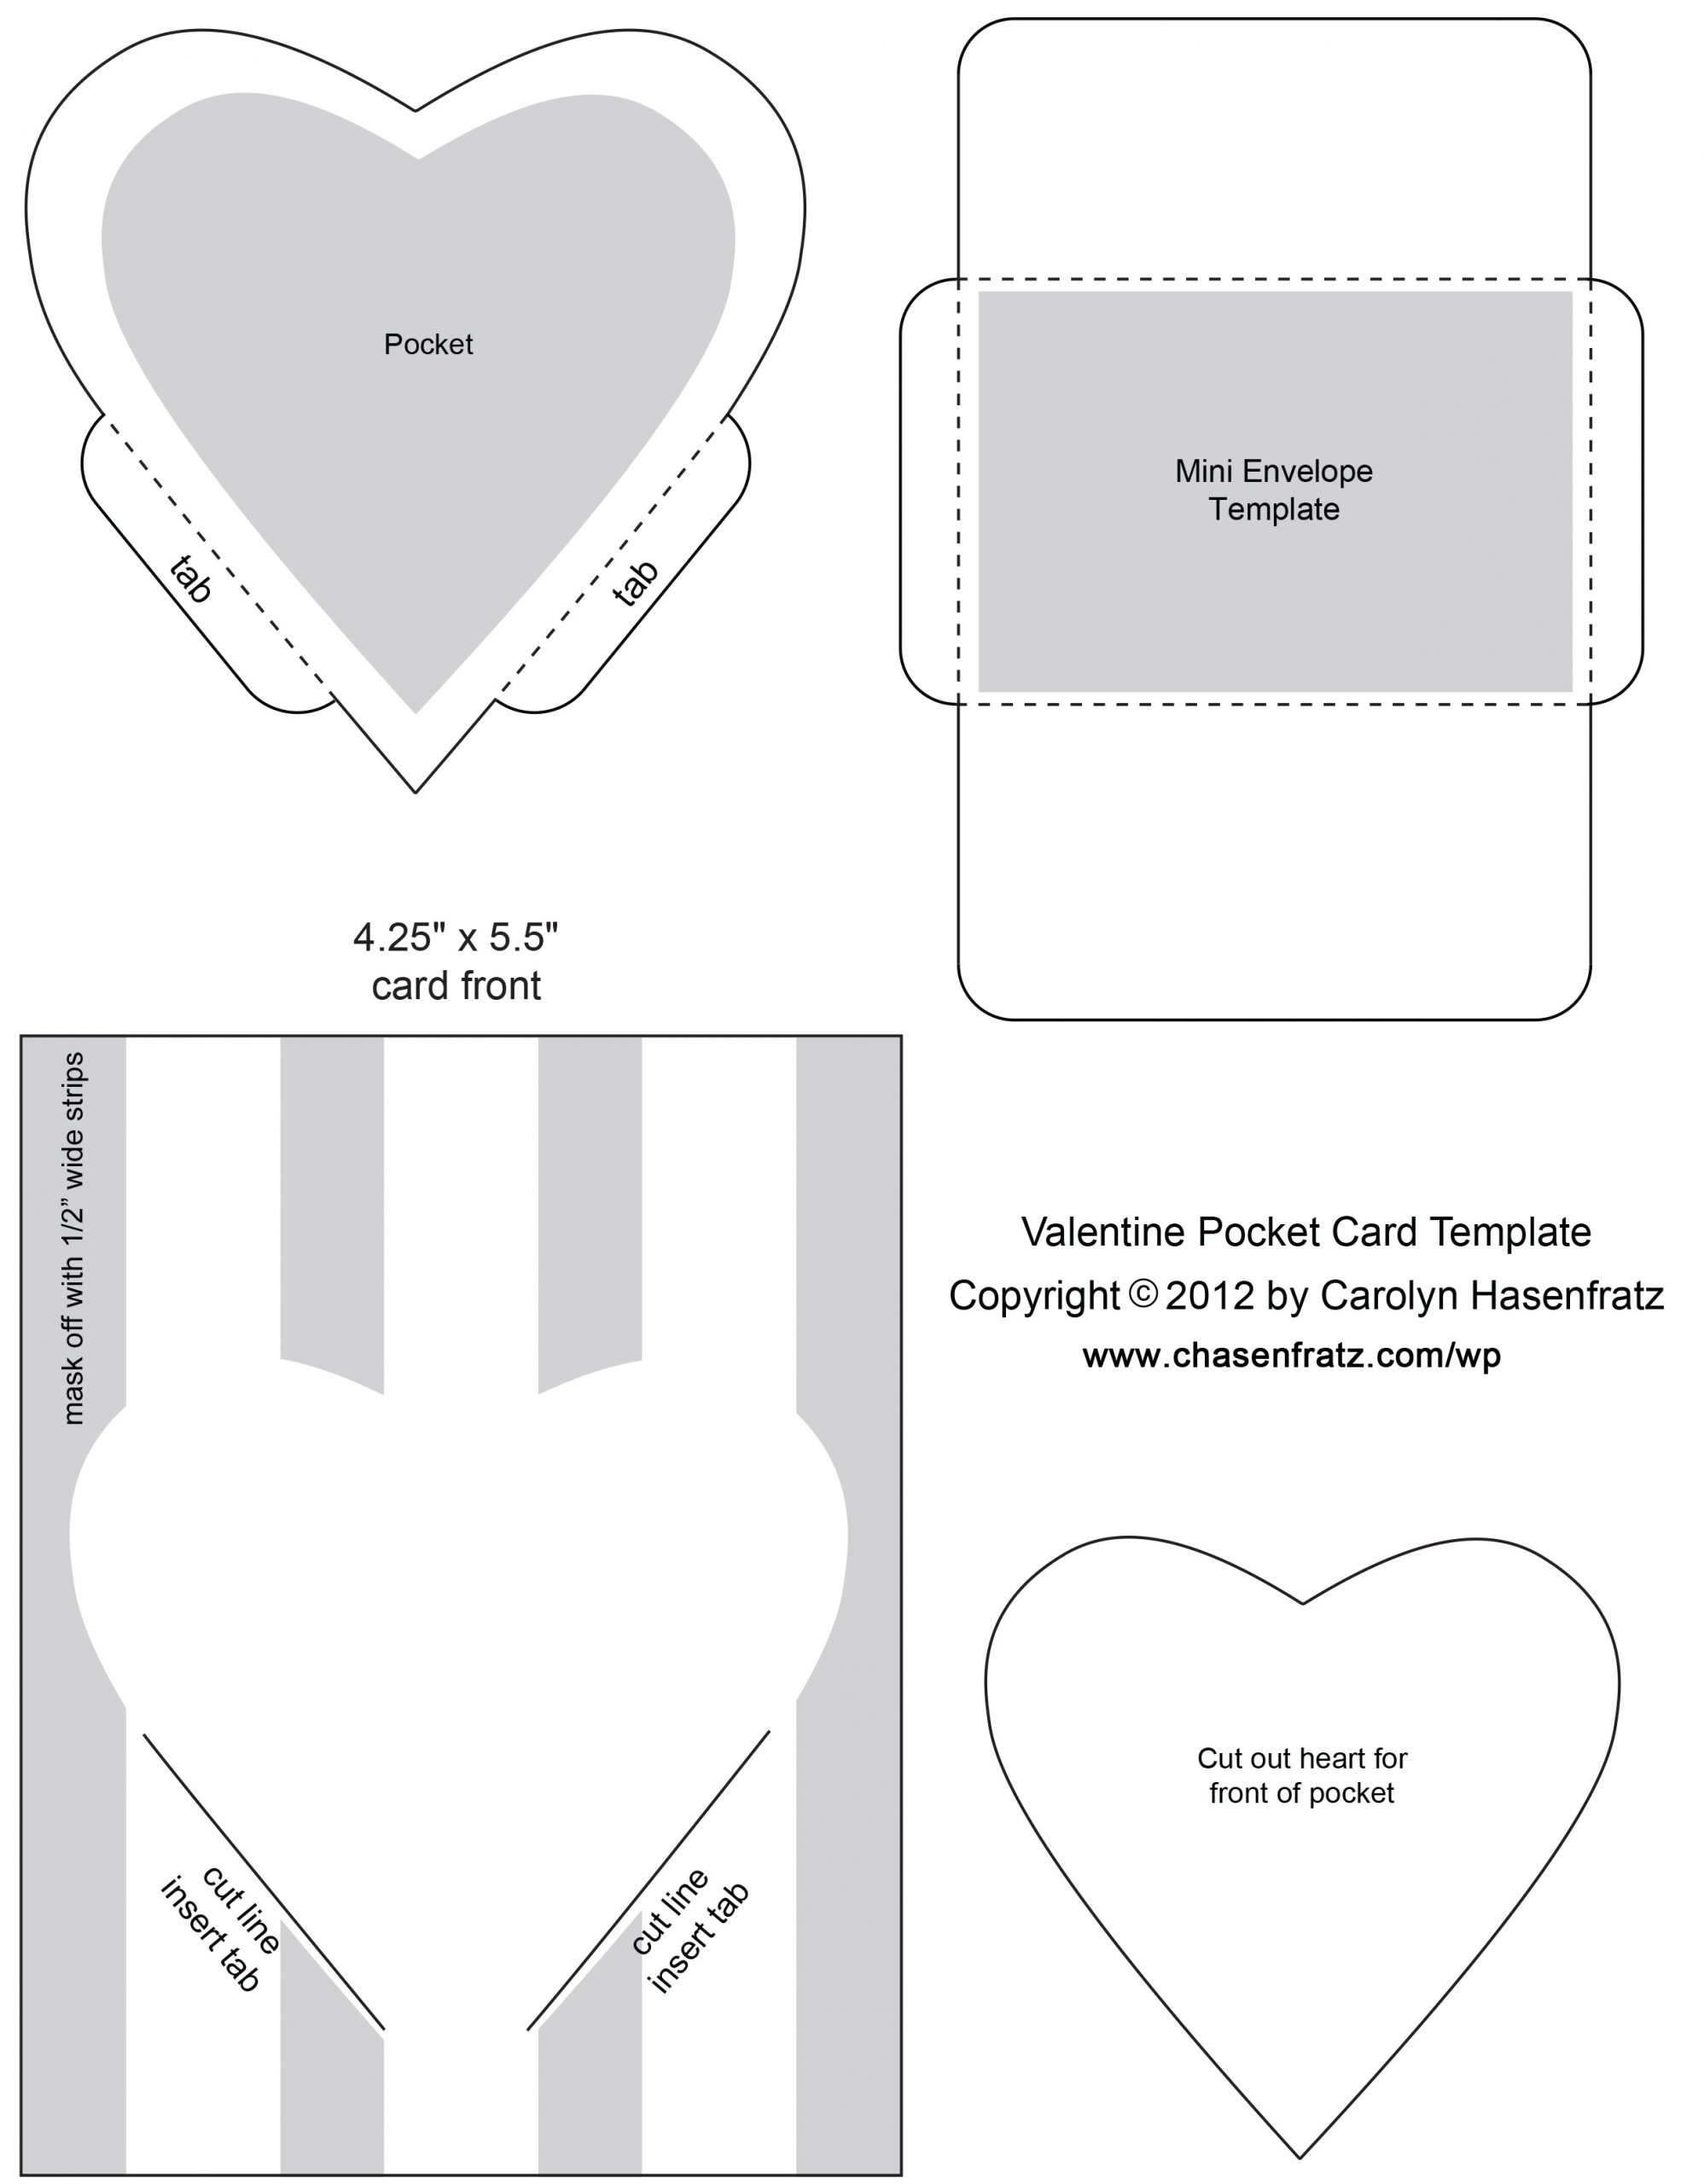
Old greeting cards Christmas and holiday theme papers and images – new or upcycled Template Valentine Pocket Card Self-sticking laminating sheets Pen or pencil Paper cutter Scissors Scrap chipboard Glue stick Metallic paint pens Small rubber stamps Assorted colors rubber stamping ink Clean scrap paper Burnishing tool, such as a bone folder Optional – stickers
Clockwise starting at top left: paper scraps, mini envelopes before assembly, sentiments cut from greeting cards, Mini Envelope Template, Mini Card Template made from scrap chipboard.
Instructions
First download and print out the template Valentine Pocket Card. Cut out the Mini Envelope Template and for durability, laminate it with self-sticking laminating sheets. Use this template to find and trace around holiday themed papers and envelopes to make cute tiny envelopes. Fold the tabs at the dotted lines, and use a glue stick to glue the bottom flap to the bottom of the side flaps.
Next make a little rectangle out of scrap chipboard to use as a template for finding and tracing around greetings and sayings from old cards. The dimensions for the rectangle are 2 7/8″ x 1 7/8″. Trace with a pen or pencil around sections of cards you want to use for a mini card, then cut out.
After cutting out the greetings and sentiments, outline the edges with a metallic paint marker, and use some small festive rubber stamps to apply holiday related designs around the border. Add stamped accents to the fronts of the envelopes as well. If needed, use clean scrap paper and a bone folder to blot the inks you’re using before handling the cards so that they don’t smear.
Glue colorful festive papers to the backs of the cards with a glue stick. Burnish well, and trim.
Once they are dry enough to handle, the cards are ready to insert into the envelopes. You can seal the top flap of the envelope with the glue stick, or use a festive sticker to close the flap.
Further Reading
If you would like more ideas about how to have a more sustainable holiday season, here are other articles of mine on this topic.
Narrow strips of paper attached to a piece of scrap plexiglass.
I work on a lot of small scale stamping projects and I stamp a lot of tiny stamps, many unmounted. Sometimes I stamp things like little words for collages, mini greetings for tags and cards, or dates or days of the week for planners and journals. I like to stamp a lot of extra paper pieces for future projects when I get my stamps out – it saves a lot of time.
When I stamp a lot of tiny stamps at a time, the task is a lot easier if I tear a bunch of paper strips with a ruler then temporarily attach the ends to a piece of scrap plexiglass with rubber bands or tape. Otherwise the paper strips are kind of hard to keep in place for a clean print since they are so light and the ends tend to curl a bit.
Here are some of my tiny stamps next to the acrylic blocks I use for mounting them temporarily with double-sided tape.
I use the fronts and the sides of small acrylic stamping blocks to temporarily mount my tiny stamps with double-sided tape. I’m not that fussy about keeping the blocks clean since I usually stamp in black. But every once in awhile I’ll scrub them with stamp cleaner or Simple Green cleaner when they get too inked up to see what I’m doing. One of the reasons to use clear acrylic blocks is to see where you are stamping! If it’s not that critical to be precise you can use any small object that you can tape a stamp to and don’t mind getting inky as a temporary mount, for example I often use the lids of pill bottles or the edges of Tic-Tac containers.
Make your own decorated paper tags for a variety of craft projects!This is a good project for using up a lot of paper scraps.
Tools and Materials
Tag Art Template (scroll up and alt-click to download or get PDF – PDF Tag Art Template) Ball point pen Medium weight black marker Black rubber stamping ink Rubber stamps with sentiments Light colored, light weight paper Assorted paper scraps in a selected color scheme – I used neutrals in this demo Clean scrap paper Ruler Bone folder or squeegee Scissors Glue sticks Hole punch String, twine, or embroidery floss
Instructions:
Download my .jpeg graphic Tag Art Template above. If you prefer a PDF file here is a link – PDF Tag Art Template. Print it out onto cardstock if you can, or print it on regular paper and glue it to cardstock for stiffness and durability. Cut around the tags and punch the holes. Now you have a set of tag templates ready to use.
Here is a selection of tag templates I made for myself out of various scrap card stock and chipboard.Besides my pattern, other good sources of potential tag shapes are cookie cutters, commercial stencils, and tags from gifts you get than you can trace.There are also clear and colored plastic tags for sale where craft supplies are sold. Those could be traced and also used as the covers for tag books.
2. Trace the tag shapes onto assorted cardstock pieces. If you have scraps this is a good way to use some up. Cut out the tags close to the lines you drew, but a little outside. That will help you cut a clean edge later.
3. Pick out some light-colored paper that complements your chosen color scheme. Use a ruler as a straight edge to tear the paper into strips. Stamp greetings and sentiments onto the paper pieces with black stamping ink.
I stamped neutral pastel color strips of paper with assorted sentiments in black rubber stamping ink. Most of the stamps you see here are from my unmounted stamp set Assorted Greetings and Sentiments. You could use any sentiment stamps that you have around or tear words out of found papers or old cards.
4. Place the tags on your work surface with the outlined sides down on clean scrap paper. Glue a sentiment on the front of each tag. Fill in the rest of the tag with paper scraps. Tear them into narrow strips with the ruler if you need to.
Adding stamped sentiments and strips of decorative paper scraps to my cut out tags.
5. Trim the tags following the pen line on the back and punch out the holes.
6. Outline the tags with a black sharpie marker
What they call a Sharpie Fine Point I think of as a medium point marker because they make much finer ones. Any black marker will do if it gives you the kind of line you want around the edge. If you like, experiment on scrap cardstock or chipboard before you outline a finished tag.
7. Select two or three strands of string, twine or embroidery floss and thread through the holes with a lark’s head knot.
Once you have made the tags, what can you do with them?
Put one on the front of a greeting card.
Decorate a gift package.
Use as a bookmark.
Make a tag book.
Enhance a shadow box.
Incorporate into scrapbook or journal pages.
Make a decorative seasonal garland.
Make motivational notes for yourself.
Create decorative door hangers.
Label bottles or jars.
What else can you think of? Have fun with your tag art!


