Mini book envelope template Paper cutter Stapler Scissors Glue stick Card stock Scrap chipboard Marker Pen Pencil Assorted text weight paper Craft knife Cutting mat Metal ruler Needle and thread Buttons Twine Needle tool or awl for poking holes for sewing (optional) Circular hole punch (optional)
Instructions
Download and print out the mini book envelope template. Roughly cut it out and glue it to card stock with a glue stick. Cut it out along the edges. Now it’s durable for repeated use.
Glue the printed out template onto scrap cardstock for durability, then trim.
Get an assortment of text weight paper, like typing or copy paper, and cut it into 4 inch by 2 inch pieces.
Fold three or four of these 4 x 2 inch pieces in half.
Cut some assorted card stock also into 4 x 2 inch pieces. Fold one in half for a cover for each book you want to make, over the folded text weight pieces.
Staple each book at the spine.
If needed to make the pages and cover even, trim the fore edge of each book with a utility knife and ruler, or a paper cutter.
Now you can doodle, color and collage on the tiny book pages whenever you have a little time. You can freehand draw or use a stencil to help you get started.
I made a stencil out of some scrap chipboard of some of my favorite doodle shapes to trace and help jump start some doodle pages.Doodling and collaging using my stencil shapes as a starting point.
To make an envelope for your book, trace the mini book envelope template onto the reverse side of some card stock.
Fold the envelope at the dotted line, then sew buttons on the flaps. If you want, you can cut some circles out of cardstock with a punch to set off the buttons. Tie a piece of twine to one of the buttons to make the envelope closure. You’re done!
Sew buttons to the top and bottom flaps so you can wind twine around them for a closure when the envelope is closed.Tie twine to one of the buttons to make a wind around closure.
Here is a link to a similar project I made several years ago, this time with mini accordion books:
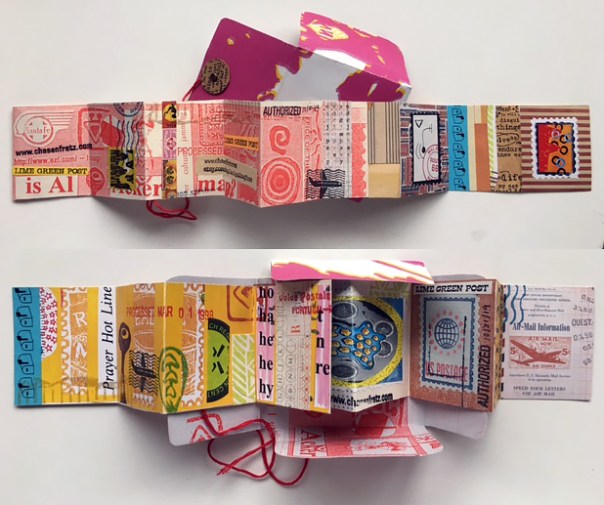
Photo by Carien Van Hest. Both sides of the mini accordion book I sent her with its two-sided envelope.
Back in 2019, I made a couple of square mini accordion books, 2″ x 2″ in size when folded up. While sending out my 2020 Christmas cards, I finally made envelopes for holding four of them and I sent them out to a few people in my Mail Art network. Here is an article I wrote about how I made that batch of little books – Made From Scraps: Mini Accordion Books.
In the spring of 2020, shortly after the pandemic started, my husband Tom and I started hosting a #virtualartparty online for several weeks in a row to help ourselves and people we know cope with loneliness and anxiety. During the second session, I demonstrated how to make these little accordion books since they can be made from scraps and supplies many people already have around the house. At the end of this article is the archived video of that accordion book session. I started two books that afternoon, which I finally finished recently.
The image below shows the first book, titled “The Wonder of Life”. The top two images are of each side semi-folded. Below that are some close-ups of different sections of the book. To make these mixed media collage compositions, I combined found paper scraps, rubber stamping, design tape, stencils, marker drawing, and image transfers made from clear packing tape. Here is an article I wrote about how to make the image transfers – Art Journaling With Stencils and Image Transfers.
Mini book by Carolyn Hasenfratz Winkelmann called “The Wonder of Life”.
The next image below shows several examples of image transfers I was making next to sections of the stretched out accordion books that I was trying to coordinate with. I knew I would not know exactly how the semi-translucent transfers would look when they were laid over the underlying paper collage, but to make sure they were at least somewhat harmonious I looked for images for my transfers that reflected the colors and shapes of images I used in my first layer.
Coordinating transfer images to lay over collaged images.
I made a template for an envelope to fit the books or any thin 2″ x 2″ object for people to download and use to make an envelope for their book if they so wished.
Mini Book Envelope Template
I used the above template to trace two envelopes onto cardstock. I cut the envelopes out and made folds where the dotted lines are in the template so that the envelopes would be thick enough for the little books. With a circle punch I cut little circles to use for making a string closure. I made extras knowing I was going to put transfers on these circles – I wanted to be able to choose from several to get ones that looked good with the finished envelopes.
My next step was to paint the fronts and backs of each envelope with clear acrylic medium, letting the medium dry before I flipped them over to coat the other side. This step was for three purposes – to increase durability, to reduce wrinkling when I later applied layers of transfers and paper, and to make the paper more receptive to the slick tape transfers. When all was dry, I applied transfers to the outsides of the envelopes using clear medium as the glue and burnished them well to remove any air bubbles. After they were dry I trimmed the transfers to the edges of the envelopes.
Applying tape transfers to cardstock envelope. Envelopes after trimming.
For the insides of the envelopes, I used the acrylic medium to laminate a pieces of paper with a matte finish to the insides of the envelopes. I wanted a matte finish for the insides instead of a shiny finish so that the envelopes would not stick to the books when stored.
The final steps in finishing the book covers were to attach the small cutout discs I made earlier with small brads, and wind embroidery thread around the discs to make a string closure.