I’m working on a lesson plan to possibly teach at Thomas Dunn Learning Center. I plan to make another, more polished sample. You might enjoy seeing the steps I took to make my prototype.
I took a piece of paper and drew lines in pencil to roughly divide it into 7 vertical sections – one for each letter in ROYGBIV, the way were taught to memorize the colors of the rainbow when I was young – Red, Orange, Yellow, Green, Blue, Indigo and Violet.
I made each divider line a double line, then hand drew some overlapping bird silhouettes in pencil. I treated the birds as negative space and the sections above and below as the positive space. I outlined and then filled in with black pen doodles the top and bottom sections above and below each bird. I erased the pencil lines.
ROYGBIV starts with Red, but I wanted Red to be toward the middle and not the end since the warm colors draw the eye more. I started outlining the negative space on the inside edge with red colored pencil starting with the fourth line from the left. I outlined each divider line in the successive rainbow colors in both directions and for about half the bird shape on outline on either side. I gave the outlining a soft graded treatment so that the white birds would have a “glow” to them and come forward visually when the background was filled in and darkened.
I colored in a mosaic of color patches in colored pencil roughly following the rainbow progression. For example where it’s supposed to be violet, I colored with violet and analagous colors such as purple and pink. The only thing I left white was the middle of the bird shapes.
Colored pencil leaves kind of a waxy surface that doesn’t take pen or marker ink well sometimes, so I sprayed the piece with Workable Fixatif to treat the surface to accept marker and pen.
Here is how it looked with the background textures partially filled in.
I wanted a darker background so the birds would stand out. Some of the doodles I drew lended themselves to filling in the negative space in solid black. Other patterns I had to get a little creative with to find a way to make them darker. I looked for ways to add solid black areas to those patterns.
Here it is all filled in. I’m going to make a neater sample on sturdier paper as a sample then schedule the class. This was a test to see if the concept would work, and I think it will! Do you have an suggestions? Please comment if so!
Here is Dad in Open Art Studio with me at Thomas Dunn Learning Center a couple of days ago. He’s coloring in a black and white doodle he did last year.
Some of my finished scribble art. This is the second of two scribbles. Are these finished “art”? Maybe they are, but even if they are not I might use the resulting textures as collage elements or image transfers in other projects in the future. They should look pretty good as is with a nice mat and frame.
The work on this page was inspired by the project “Collaborative scribble drawing” in the Expressive Arts Activity Book that I use a lot for study and inspiration (Darley and Heath 60).
Scribble art is a great icebreaker. No artistic talent or skill is needed so it’s easy to get started. If done as art therapy it can also create a rapport between the facilitator and the client by making it into a collaborative activity (Darley and Heath 60). For example, in a two person exercise each person can make a scribble on a blank piece of paper, then the participants trade papers and finish off each others drawings. The initial scribble can even be made with eyes closed to take all the pressure off of having to show artistic skill. Abstract results can also be a way to encourage conversation about something the scribble might remind the participants about (Darley and Heath 60). Following are several examples of scribble art that I made with my husband Tom and my Dad Don.
If you want to try something like these samples, here is a list for tools and materials.
Tools and Materials
Bristol board or drawing paper
Pencil
Eraser
Stencils
Black markers in various widths
Colored pencils
Found papers for collage – I used the insides of business envelopes
Tracing paper
Tape
Glue stick
Scribble art by me and Tom. I did moths on the left with Tom’s scribble and he used my scribble to add in various textures from stencils on the right.
Tom and I each made a scribble with our eyes closed with black marker on Bristol board. Next we traded papers and used commercial stencils by The Crafter’s Workshop to further develop the designs. Then we finished off our designs by coloring in parts of the image with colored pencils and markers.
Tom’s scribble was a challenge to work with because it was very dense. It did remind me of something – I turned it into moths trapped and tangled to represent trying to overcome some kind of frustration or challenge. This kind of work is not only good for the brain but just from a visual point of view it’s a good way to discover effects you might want to use in other art later on.
Scribble art by my Dad. Texture practice on the left, filling in the scribble on the right.
These examples were made by my Dad. First I gave him an introduction to Zentangle and doodle art which I wrote about in a previous blog post. He practiced making some repeating textures. Then we each made scribbles on two sheets of drawing paper. We kept our favorite of the two sheets then traded the other. Then we filled the sheets in with textures from our samplers. For extra fun we glued cutouts from the insides of business envelopes into some of the areas in the scribbles. I thought they looked cool with the hand-drawn textures. The tape and tracing paper from the materials list were used along with the pencil to get my collaged paper pieces to fit in their spots on the scribble drawing.
This is my first scribble art sheet in progress. I think it’s against the “rules” of Zentangle to pre-draw pencil lines as a guide before rendering the designs in marker. But I did it anyway!My finished scribble art after erasing the pencil lines. Bristol board and robust good quality drawing paper will stand up to a lot of erasing if you need it.I made a scribble version of Faux Postage using a printable template I shared awhile back. Dad had started this sheet awhile ago by making marks with stencils and markers in the upper left. He’d left the sheet unfinished for a year or two so I asked him if I could finish it. I was inspired by blue and black patterned envelope insides to make a monochromatic design on the sheet. When I finished marker drawing, coloring and collaging, I glued on some little pieces of paper printed with rubber stamps to evoke postage stamps. I’m going to get printouts made of this sheet and send it out to other artists when I next do some Mail Art.
I’m grateful to Dad and and Tom for doing art with me from time to time. I sure do feel a lot less lonely when I get to do a project with somebody. It helps us all with our general well-being and is also a great way to spend time together. When you’re working on art that is mostly mindless, once you get started, it’s easy to talk about various things. It’s also a good activity to do alone when you’re stressed and need to get in a better state of mind. The finished product really isn’t the point if you’re doing it for therapeutic reasons, but I also get skills and inspiration for future art work while I practice.
Works Cited andRecommended Reading
Darley, Suzanne and Wende Heath. “The Expressive Arts Activity Book: A Resource for Professionals”. Jessica Kingsley Publishers, 2008.
When I was in grade school in the 1970s, I developed an unquenchable doodling habit early on. I covered almost everything in sight with doodles, including my brown paper textbook covers, folders, notebooks and tops of desks – I used pencil on the Formica tops so it would wash off. I thought my habit was harmless and decidedly my own business because I only doodled on my own property or with media that was washable, and I refrained from doodling on homework. I remember that my third grade teacher didn’t agree with that point of view at first and would try to curb my habit by confiscating my implements whenever she saw me doodling away. I don’t think that lasted long. My Mom complained to her about it and gave me extra pens and pencils so I’d always have another one anyway. I was mostly an obedient child but this is one area where I flat out refused to conform. Before too long I was left alone as long as I washed my desk top periodically. That seemed fair to me and all was peaceful from then on.
A popular item I remember from the 1970s was a DoodleArt kit. These were basically sophisticated coloring posters for older kids, teenagers, and adults. The black and white design was Doodled for you and the consumer was meant to color them in with colored markers. As I recall these were sought after items by myself and my peers in the 70s. While shopping at the toy store and the craft store I would drool over them. If I got one for Christmas or a birthday it was a thrill. Here is a link to a vintage DoodleArt kit for sale on Etsy, and I also found an apparently attempted DoodleArt revival on Facebook.
In the present day, many adults once more enjoy adult coloring, similar to actual DoodleArt. Many people like related activities such as art journaling and bullet journaling. Popular Zentangle is a form of meditative pen and ink art where the artist fills in sections of a design with repeating patterns, usually in black pen or marker. Some people add color to their Zentangle designs. Zentangle results do remind me of DoodleArt in a way, though Zentangle practitioners freehand draw their own designs instead of purchasing pre-made coloring pages.
A lot of my art journal pages are somewhat similar to Zentangle, in that I often like to fill in sections with repeating patterns, sometimes hand-drawn, sometimes traced from a stencil. Whenever I put some of my new art journal pages on Pinterest, in the area where you are shown similar pins to your own, a lot of Zentangle art comes up in my feed. I decided just for fun to try Zentangle for real just to learn a variation on what I already like to do. It really scratches that doodling itch that I still have!
My sampler #1
There are lots of samples online of fill-in textures that you can draw in your Zentangle designs. I’ve linked to a few on a Pinterest board so you can see samples and get inspiration. After viewing some samples I decided to make a few of my own samplers featuring my own textures inspired by art journal pages I’ve already done. Here are some easy instructions for making your own sampler.
Tools and Materials Drawing paper Ruler Pencil Eraser Selection of fine tip black pens and markers of different diameters Optional – circle template
Use a ruler and pencil to divide drawing paper into evenly sized squares or rectangles.Outline areas in one thin line and one slightly thicker line. Fill in each section with a hand-drawn texture of your invention. Erase the pencil lines as you fill in the paper.As a variation, on a second piece of drawing paper I slanted the lines to make more irregularly shaped sections to fill in.Yet another variation made by tracing four different sized openings from a circle template.
Some samplers I’ve seen online are works of art in their own right. The ones you see here are not that refined – they are more for practice and developing a vocabulary of textures that reflect my own taste in design. When I’m ready I’ll have lots of choices I can use to make my own version of Zentangle art.
Coloring Idea #2: Rainbow Effect With Gel Pens and Colored Pencils
Experimenting with different ways to use stenciling as a base for coloring. Commercial stencils that I used to make the letter patterns are by The Crafter’s Workshop.
Sometimes when I do “adult coloring” I have a specific idea that I am trying to explore. At other times, I just want to color without thinking too much – it’s so soothing. Rainbow color gradations are a sure fire way to lift my mood. Here is how to get a fun effect with stencils, gel pens, and colored pencils.
Step 1: Tape a stencil over the design area and outline with a thin, sharp pencil. For this kind of utilitarian marking I really like a mechanical pencil. It’s easy to erase and I don’t have to keep stopping to sharpen it.
Step 2: With the pencil and ruler, draw parallel lines at intervals across the page.
Step 3: Note how the pencil lines you drew divide the design into striped areas. Outline your pencil lines in one gel pen color per stripe in rainbow order. For example, I outlined the first in blue, then blue green, then green, then yellow, continuing through to pink.
Step 4: To make sure the gel pen is dry, lay a clean sheet of scrap paper over your design then burnish with a squeegee or bone folder. Lift the paper and check to see if any of the ink is coming off onto the scrap paper. Repeat if necessary until no ink is transferring.
Step 5: Erase your pencil lines. You probably won’t be able to get all the pencil lines out from under the gel pen ink lines, but the rainbow effect will still come through well enough. If the pencil lines bother you, you could go back in and touch up your work later with opaque gel pen colors, paint markers, permanent markers or the like.
Step 6: Color in gradations in pencil between and around your gel pen lines, maintaining the overall color progression in hues. There is a lot of room for creativity in how to color in this step. I choose to make the pencil colored in areas lighter tints of the hues in the gel pens and keep analagous colors roughly together. Keep experimenting and coloring until you are satisfied with the effect.
The example at the above right is not finished yet. Here are a couple more examples I’m working on of the same idea so you can see the work a little closer.
In progress: art journal page on the left, beard pieces on the right.
This is a time-consuming way to color, but sometimes that is just what I want. It requires just enough concentration to distract me from problems I want to forget for awhile, but it’s not so hard to do that I need a lot of energy. Sometimes when you’re in a crisis great ambition isn’t really there. I may or may not leave some of the background white. We’ll see!
Stenciling and coloring on an art journal page. I used a hand-cut stencil of my own design plus a commercial stencil by Tim Holtz.
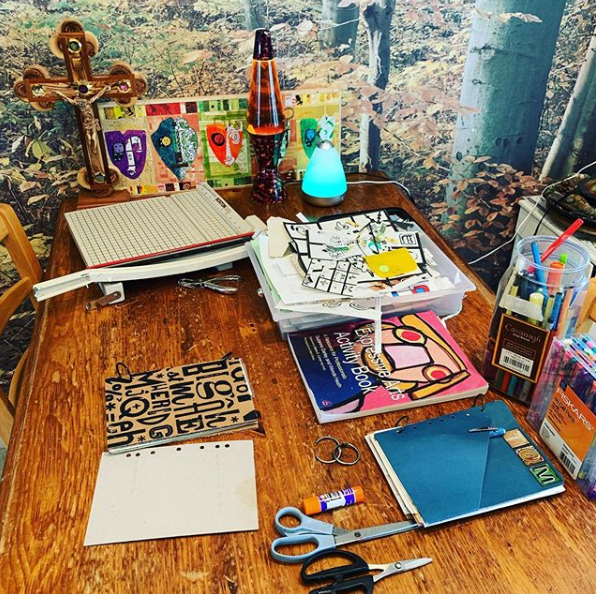
Bringing the coloring to Dad in the hospital
I worked on the samples you see in this article and for PART 1 both on the go and at home in order to have samples to show to my Dad. Dad likes to do the #12daysoftomsbeard project and he requested that I bring him some shapes for it to color on at the hospital. I wanted to give him a choice of coloring techniques, so I had samples of each technique ready. I had supplies on hand to cover either choice, but to streamline my supplies I only brought colored pencils as both techniques can be done with colored pencils even though I used colored markers for the first one. Dad chose the stained glass effect from PART 1 – stenciling over patches of background color.
When I brought this project to Dad, he was only a few days past some serious seizures that affected both halves of his body, but especially the left. Dad is left-handed and I was very worried because Dad’s left hand had been in a claw-like position for about a week or more. After the seizures his hand relaxed. I wasn’t sure how much function Dad would have in the hand yet, so I prepared a couple of sheets of shapes in advance for us to color, one for me to demonstrate on and one for him. I taped the shapes to scrap chipboard pieces so they wouldn’t slide around while being colored. I also brought some shapes that still needed to be cut out so that Dad could cut some if he was able.
I brought some pre-cut tags with me taped to a scrap card stock backing and also gave Dad the option to cut some out himself.
I showed Dad an overview of what we were going to do, then I offered him a chance to try cutting some shapes. He did a great job on them – with a right-handed scissors no less! I was overjoyed and a bit teary-eyed to see him doing so well. I told him this is what I want for Christmas – to see you able to do this! It seemed like a miracle compared to how he was just a few days before. For awhile I wasn’t sure if I was going to be able to ever talk with him again, much less do art together!
We used some beard shapes and holiday inspired cutouts as backgrounds for colored pencils.
I suggested some color schemes for Dad – primary colors, secondary colors, and analagous colors. It wasn’t critical that the pieces be of any particular color scheme, but when I teach a project, if I can I like to include some useful art information. I’m not a trained art therapist but I am a trained artist so I can legitimately call these activities “educational” even if I can’t officially call them “art therapy” (Darley and Heath).
I got some colored pencils out for him to cover each scheme, and let him pick from among them. Instead of covering the whole background like I did on mine, he mostly drew small shapes all over the background without covering it all the way. And instead of coloring in the negative spaces between stencil markings, he put numbers on his tags, numbers 1-11 to go along with the #12daysoftomsbeard. He was short one tag, so I’ll make a #12 later when we get to that.
In this kind of project, expressive arts for therapeutic purposes, the process is far more important than the finished results (Darley and Heath). There is no reason to try to change what Dad wanted to do if it varied from my samples. Dad has always been creative – I was so glad to see that ability is still there!
Stenciling over colored tags.Commercial stencils used to apply these patterns are by The Crafter’s Workshop.
Here I am drawing stencil lines over the colored in shapes before filling in the negative spaces with black permanent marker. The main difference between coloring over marker vs. colored pencil is that the colored pencil creates a slightly waxy surface which might resist the marker at first. To help with this, I outlined the black areas in gel pen before filling in with a black Sharpie marker. The gel pen sticks better to the colored pencil and once the outlining is done then it’s not hard to fill in with the Sharpie.
Embellishing colored pieces with punched paper shapes and sequins.
I have started embellishing some of the pieces that we colored with punched paper pieces, glued-on sequins and little dots of squeeze paint to go along with the stenciling.
Caption
When #12daysoftomsbeard starts on December 25, we’ll have a good selection of items to display on the beard. Hopefully people will send us more parts as a challenge to incorporate each day. The first year we did this activity, in 2019, I started out by clipping little pieces of paper to Tom’s beard with tiny clothespins. To keep things interesting, we’ve been gradually elaborating by making little garlands, involving Tom’s glasses, adding found objects and props, incorporating parts of the background, using far-out creative filters and more.
What will happen?
Some of my favorite #12daysoftomsbeard pictures from 2019-2022
Above is a commemorative artistamp sheet I made to show off some of my favorite beard pictures from the first three years we did this project.
Works Cited andRecommended Reading
Darley, Suzanne and Wende Heath. “The Expressive Arts Activity Book: A Resource for Professionals”. Jessica Kingsley Publishers, 2008.
The 2022-23 Holiday season for many people is probably going to be the closest they’ve had for awhile to normal patterns of celebrating. My Dad and I have made some attempts to join in this year, but to be realistic most of our energy has been absorbed by the effort to get and stay healthy. My Dad has been having some medical issues since mid-October and I’ve been staying with him frequently at his house and visiting him him a lot in the hospital. Except for the past week – I just took a week off because I seem to have been hit by a flu-like illness (not COVID, I took the test!). I’m on the mend now. Dad has been taken care of during this time at a rehab hospital and will be coming home later this week if all goes as planned.
When he’s discharged, I’ll be providing some care he’ll need for about three weeks. I’m not sure how much either of us is going to be able to attend holiday activities in person. We will probably have to sit a lot of it out. But we will try to keep in touch online!
The annual project #12daysoftomsbeard is one that my husband Tom and I have been doing every year at Christmas time. It’s a way of combining crafts, installation art, photography, mail art, digital art and conceptual art into a holiday celebration for us and our friends and family and anyone else who wants to join in. From December 25 through January 6th he poses for me with different items in his beard and I apply wacky filter effects then upload the results to Instagram. We invite people to send in pieces to use in the beard. My Dad in particular really enjoys this activity and he wanted to work on some beard parts while he was in the hospital. I’ll show you how we combined stenciling and coloring to make a bunch of pieces to use in Tom’s beard during the 2022-23 Christmas season. I’m going to try to make an extra big deal out of it this year for my Dad and myself because we are going to miss out on most other holiday activities this year.
If you want more background information on #12daysoftomsbeard before reading on, here are a couple of my earlier blog articles about it.
Tools and Supplies Beard printouts – scroll to bottom of the page for links to 6 graphic files to download and print Cardstock and chipboard Pencil and eraser Ruler Black permanent markers Black gel pens Colored pencils Colored markers Painter’s tape Stencils and/or cookie cutters Scissors Hole punch Scrap paper for covering work surface Glue stick Squeegee tool or bone folder
Optional for Embellishments Sequins Glue Squeeze paint
Coloring Idea #1 – Stenciling Over Colored Markers
Stenciling over colored markers
Instructions
Scribbling some colored backgrounds is an easy way to make vibrant backgrounds for stencil art. By filling in the negative spaces with black marker, you can create an attractive faux stained glass effect.
Step 1 – Color in the background with markers in random patches to make something similar to camouflage patterns
Step 2 – Tape a stencil over part of the work area and outline in black gel pen, black fine tip marker or black fine tip pen.
Step 3 – Repeat with different stencils until the whole design area is filled with outlines.
Step 4 – Color the negative spaces in with black marker.
Step 5 – With a glue stick, paste paper pieces to chipboard or cardstock and cut out.
Step 6 – If needed, touch up the edges with black marker to make a neat edge.
Stay tuned for PART 2: Rainbow Effect With Gel Pens and Colored Pencils.
I fell down the stairs and bent my foot the wrong way. I might have two broken toes, I realize it could have been a lot worse. The pain is way down today so my head is more clear and I can actually write something! I don’t have to spend 100% of my time off of my foot until I have a follow up appointment with an orthopedic doctor, but I will have to spend the majority of my time with it elevated, at least for awhile. Not sure for how long, but in the meantime I’m taking the opportunity to study my art therapy book and my horticultural therapy books to see if there is anything I can do to cope better with the fear and frustration of being temporarily unable to move around much. I’d also like to help my stressed out family cope with helping me with my injury while dealing with other severe recent losses. What can I learn while I study and try things out?
Having Some Fun With Negative Space
I started out by working on some collages I began during #virtualartparty number 4, an online session my husband and I hosted to help our friends and family do a little art and hopefully feel less lonely during the pandemic. I’ll write more about the collages later, but for now I want to write about the leftover cut away paper pieces I was dropping in the waste basket to be composted. The shapes were interesting, and reminded me of something. What was it? Why were these scraps interesting? Then I remembered this really cool architecture photo I had put on an Architecture Pinterest board. And some sketches I’d done for a ceramics class in the spring of 1990. Good memories of one of those times when I couldn’t stop the ideas from coming, and a pretty good percentage of them still seem exciting to me.
What I was noticing was the shapes made by the negative space – the parts I cut away – and how they reminded me of positive and negative shapes that I responded strongly to. I took the most interesting white paper scraps back out of the waste basket and glued them down on black paper. I scanned them into the computer to make these positive and negative images to see if they inspired me to make something with them.
Using Photoshop, I made selection outlines out of the white shapes, stroked them in black, and printed out the results as coloring pages so I can try to encourage myself and other people to enjoy the benefits of coloring and art making. There is enough going on to get people started – sometimes a blank page is intimidating if people don’t know what to draw or color – that’s a tip I learned long ago in Drawing 1. There is still room for individual creativity in these and other coloring pages I’ve made available for free download.
The shapes that resulted from the paper cutting do somewhat resemble natural forms, but the overall design so far is abstract. Is abstract art good for therapeutic purposes?
I often encourage people to try making some abstract art in a project that is relatively low stakes such as an art journal page, because my reasoning has been that many untrained artists are afraid that they can’t draw and therefore are discouraged from making art that attempts to be representational. If I can show them how to make art from found papers and found objects, maybe that will help them become less inhibited and just have fun.
My favorite kind of art is abstract and if need be I can keep myself entertained with shapes, colors, textures and lines for hours if not days on end. Even if I think it’s fascinating and fun, abstract art is likely going to be a hard sell for most people. Those who appreciate abstract art the most are often art and design professionals or people very knowledgeable about art, such as patrons or collectors. The general population is mostly not that big of a fan and prefers recognizable nature-based images (Marcus and Sachs 15). We know from reactions to modern art and modern public sculpture how wide the gulf can be between the tastes of art and design professionals and the general public. If this sounds elitist, it’s not meant to be, it’s just a fact pointed out in a therapy book to help practitioners offer projects that are most helpful to the patient (Marcus and Sachs 15).
Abstract art isn’t necessarily therapeutic to people with certain conditions or states of mind. Experiments on physically or emotionally stressed patients revealed not only an affinity toward nature imagery but hostility to abstract art – even to the point of attacking the abstract pieces in some cases. The same artwork often prompted positive reactions from the staff, showing how the varying states of mind of individuals influenced how the artwork was perceived (Marcus and Sachs 30-31).
Practitioners intending to use art to facilitate health should keep the client’s needs in mind above their own personal tastes (Marcus and Sachs 15). Stress is detrimental to healing, both mentally and physically (Marcus and Sachs 25), so the last thing I would want to do is add to someone’s stress if I was trying to help them.
What could I add to my abstract background to make a project that is more soothing to the general public? My project is aimed at people who want to color but don’t necessarily want to draw. I have several stencils in my collection with botanical imagery that will appeal to the universal human need for nature-based imagery. I can use colors that are soothing and also found in nature. I chose blues and greens for this demo because hot colors might aggravate certain conditions and interfere with wellness (Winterbottom and Wagenfeld 182).
Art Journal Page
Here is an art journal page I made with one of my abstract printouts and a botanical themed stencil.
I got out a piece of cardstock that I use as a template for making pages that fit my art journal and I traced around the printout to remind me where the page edge will be. I chose a stencil by The Crafter’s Workshop, Mini Four Ferns, and outlined the fern designs in pencil.I chose a blue gray pencil color to fill in the abstract shapes so that they would visually recede into the background behind the green ferns. Where the fern and abstract shapes overlapped, I overlaid neutral gray marker. I used green colored pencils and a green Sharpie paint marker to color in the rest of the ferns where they did not overlap the blue, and I outlined the ferns with a thin black Sharpie pen. It didn’t look quite finished so I drew some lines in pencil that are reminiscent of topographic maps. Then I was satisfied!
Works Cited
Marcus, Clare Cooper and Naomi A. Sachs. Therapeutic Landscapes: An Evidence-Based Approach to Designing Healing Gardens and Restorative Outdoor Spaces. Wiley, 2014.
Winterbottom, Daniel and Amy Wagenfeld. Therapeutic Gardens: Design for Healing Spaces. Timber Press, 2015.
Sometimes I find and save advertising materials printed on nice paper. I might like part of the imagery, or be attracted to the weight and feel of the paper, or both. It’s sometimes less intimidating to start an art journal page on paper that already has something on it than a blank piece of paper. In this article I’ll show you two ways to creatively alter found papers with text on them.
Tools and Materials Assorted found papers and scrap papers Clean scrap paper Stencils Markers and other drawing and coloring implements of choice Painter’s tape or masking tape Scissors Glue stick Burnishing tool
First, select a piece of paper with text on it, and a stencil. Tape the stencil in place over the text. Using the marking implement of your choice, outline the openings in the stencil only in the spots where there is text to cover.
This results in an interesting effect. The text turns into a texture rather than something you read, and the resulting graphic effect might suggest what to do next to finish the composition. You might decide to color in some or all of the outlines you just traced over the text.
In the example above, since I’ve used permanent black Sharpie markers, I can use almost any medium I want to add color if I want to.
There is no need to restrict yourself to using a black marker. My brother got off to a very good start on this page. He took advantage of the pale text to use colored Sharpie markers. If he wants to work on this page more it has a lot of potential. Note: my brother died about three weeks after making this page. I don’t know if I’m going to add to it or keep it as is, but it’s in my art journal.
I have a real weakness for amoeba shapes and any graphics that suggest mid-century modern imagery. I cut these blocks of text from a magazine because of the pretty shapes and colors backing some of the text.
The article I took these cutouts from was about work-life balance. There are some words in these paragraphs that would be good to have in my art journal, which I use as a self-care tool as well as for creative expression. I covered up the words I didn’t want to see with strips of scrap paper and left exposed the words I did want to see. When the glue was dry enough to handle, I trimmed the shapes. Toward the end, I got tired of gluing paper strips and for the last few lines I wanted to cover, I used a yellow opaque paint marker to finish off these pieces.
Some people compose prose or poetry this way, by removing words instead of writing them to make new compositions. In this sample I was mainly interested in making a visual statement, and I treated the words as random elements. But if you wanted to, you could make a carefully considered visual AND literary statement by selectively covering words.
Here is a two-page spread using both techniques from this article together. I think these two pages are almost complete. I’ll think about them for awhile before doing anything else to them, if I decide they need more.
It helps that these two found pages here were already strong graphically, which was part of the reason why I was attracted to them in the first place.
More Examples
Following are more art journal pages that I started by selectively covering text. Enjoy!
Art journal page. I covered up the light-colored text with vertical lines in gel pen. Then I used more gel pen, color pencils and a white paint marker to finish it off. The abstract stencil is one of my own design, the tree with birds stencil is made by The Crafter’s Workshop – it’s for sale in my Etsy shop. https://www.etsy.com/listing/1142360780/mini-cherry-blossoms-6×6-stencilOn this art journal page, I partially covered the text by stenciling with black marker to make the text into a texture instead of something readable. Then I drew through more stencils with a mechanical pencil then colored in around the pencil marks. All four stencils used here are by The Crafter’s Workshop.I used a stencil that I cut myself and a commercial one by Tim Holtz on this art journal page. I made hatch marks blocking some of the text as part of the design. I blocked out some of the text with gesso and correction tape. I had fun playing with making the text cover-up part of the mark-making.
I’m happy with how this two-page spread for my art journal turned out, even though it is kind of messy. Sometimes in the morning Tom will make the coffee before leaving for work and often he’ll leave a love note for me with good wishes for the day if I’m not awake yet. He uses paper left over from me printing out shipping labels for my online store. The leftovers just happen to be the size of my journal and planner pages. I punch holes in a lot of them and write on the other side when I want to take notes or record thoughts. Often either he or I will get coffee stains on the notes as you see here. Since I’m not starting with a pristine piece of high quality paper, there is no pressure on me to make a craft demo worthy effort every time I use these to make an art journal page. I did however greatly enjoy using stencils and stickers in the rough but satisfying example shown above to record a few thoughts about sharing morning coffee with my loved ones and having a healthy weekend.
In my last blog post, I wrote about the acronym G.R.A.P.E.S. and how the G stands for “Be gentle with yourself”. One way to do that is to take a little time to journal and let yourself off the hook if it doesn’t look like a brand ambassador did it. The activity itself is beneficial in many ways.
Stencils and stickers are real time savers when you want to slap something together without having to make a major art or design statement. I have a lot of supplies, but also I have a basic portable kit that includes some of my favorite stencils, a folio of colored pencils, gel pens, a few planner-friendly design tapes and some basic pencils and markers for writing and outlining. There are a few frequently used paper crafting tools in that kit like a burnisher, glue stick, hole punch, scissors, ruler and utility knife for cutting and sharpening pencils. I can get a lot done with that kit, and if I want to add more to the pages when I’m home, I have many more paper crafting supplies I can utilize.
The stencils I used in the two-page spread above are available in my online shop:
I have a couple of Pinterest boards full of more of my own examples along with samples, inspiration and tips from others on the topics of Art Journaling, Planners, Albums, Homemade Books and Scrapbooks. Enjoy!
Art journaling is an activity that helps me a lot with self care, artistic expression and just general management of life. Lately I’ve been experimenting with combining some artistic expression with material I’m learning in Social Engineering class. There are a lot of acronyms and concepts to remember – things that lend themselves well to bullet journals, art journals and chart and graph type graphics.
These pairs of pages you will see are in progress. I made them to have something to do adult coloring and other paper craft based activities on when I want to relax and be creative for a bit. As I work I can study and memorize the “bullet points”. I’m going to erase some of these pencil lines as I go. For a couple of the more complicated layouts I made drawings on tracing paper and chipboard templates to help cut the paper pieces to the right sizes and shapes.
Some of the stencils I used are commercial products I sell in my online Etsy shop. If you would like to see the selection, it’s at this link: Stencils and Stenciling Supplies.
I hope these pages in progress will give you some ideas for organizing information in a creative and fun way!
Two-page spread for MAPP – Mitigation and Prevention Plan.Here is a pair of pages I began to create my rendition of “Curtis’ Triad of Disruption”. I love geometric shapes, and trios. This will be fun to work on!I finally finished “Triad of Disruption” on 12/30/22! I did a couple of things a bit different than I planned.Social Engineering Pyramid two-page spread on tracing paper and then started in the art journal.Finally finished coloring these two art journal pages.