Tag Archives: home decor

Home makeover beginning and counting my blessings

Sometimes life smacks you in the face several times in a row and reminds you to put your circumstances in perspective. I own a house that I am working on fixing up. There are several things I’m considering doing with it once it’s done. In the meantime, I’m going to enjoy DIY projects and perhaps planning some bigger projects for it that I’ll need to hire some help to complete. This is a diverting and enjoyable task, even though the events behind me getting this house to work on are quite sad. It’s therapeutic to try to turn the sadness into something even more beautiful and useful than this cute house already is.

I have been frustrated because of breaking my foot in October and having to halt my work for awhile. I had a second fall later next to our workbench and landed on my miter saw! I was lucky that I only got a superficial sawtooth scratch down my arm from that. I might have a scar but who cares considering how serious it COULD have been. Now my foot has improved enough for me to do a little more and I did some cleaning and organizing in the kitchen earlier this week while I churned ideas in my head. I’ve made a Pinterest board to help me brainstorm and plan – Bungalow Project.

Today at my desk taking a lunch break, I brainstormed and fantasized about home decor topics, such as collectibles and furniture I want to get out of storage when the house is ready to stage and display, paint schemes, tile ideas, etc. No I’m not a real estate professional but I am a design professional (not specifically in home decor) so hopefully I can grow creatively while I work. I am blessed to have the luxury of being able to tackle this kind of project rather than worrying about whether I am even going to have a home to live in this winter, like a friend of mine is doing right now.

An old friend of mine from the Route 66 Association of Missouri sent me an invite to his GoFundMe drive which he initiated to try to collect enough rent money to avoid being evicted from his apartment. With his permission, I’m including a link here in case anyone wants to contribute, share ideas, or spread the word – Fundraiser by Gary Adkins.

Because I know how fortunate I am, I have made contributions to this and other causes this holiday season as I do each year. I can’t help everybody who needs it and deserves it, no one person can. With so many people in distress, it can get overwhelming and seem hopeless. Maybe helping prevent homelessness for one person would be extra satisfying because I can find out the outcome later and see concrete results. If my injury was as serious as this friend’s injuries, and my situation was different, what state would I be in? I have been blessed to go over five decades without ever having an injury as serious as my recent one, and I don’t even need surgery to fix it. I just have to be patient and wait and try to stay healthy in the meantime. How much would it take for any one of us to be in the position of having to ask for help? Temporarily I have had to ask for help with things like driving and shopping while my foot heals. I’m not used to that and it’s sobering. I am grateful for what I can do and for everyone who is helping someone in need, whoever it is.
Give a piece of print fabric the look of a “blanket”

Recently I was working on a sleeping bag for a doll, and I was looking around the house for a doll or stuffed animal that I could use to test out the size. I didn’t use it because it was too big, but I did look at a doll of sorts that I made a long time ago in sculpture class when I was working on a B.F.A. degree at SIUE. At the time I had taken the class, I had just been on a trip to Utah and had brought back with me some books on Native American petroglyphs and stone fetishes. I made a throw pillow sized soft wolf fetish with blanket and soft arrowhead for my late friend June for Christmas that year. We both shared an intense interest in Southwest travel and art. For class I made a humanoid stuffed figure with amulet bag, loincloth, and blanket.

While making the soft sculpture, although inspired by ancient Native American art forms, I did not want to refer to any particular culture exactly, rather I wanted to evoke an ancient sense of humanity that many cultures share. Throughout human history there were many ways to wear and use blankets as a part of clothing and outerwear before things like buttons and zippers were invented, and of course people still use and wear blankets in many ways today. For my soft sculpture’s blanket I chose a fabric in a garish early 1990s fabric pattern to suggest a striped blanket but not imitate any particular culture.

While working on my doll sleeping bag, I decided it was a good time to update the look of my soft sculpture. Since teaching at JoAnn Fabrics and Crafts from 2016-early 2020 I’ve been working a lot more with fabric. I decided to start with the blanket. I have a large collection of scrap fabric that I like to sew into strips to use in projects such as art quilts, purse straps, water bottle carrier straps, table runners, headbands, and more. I thought the blanket I made for the soft sculpture would look more attractive with some added strips of scrap fabric so I started piecing and sewing strips in place.

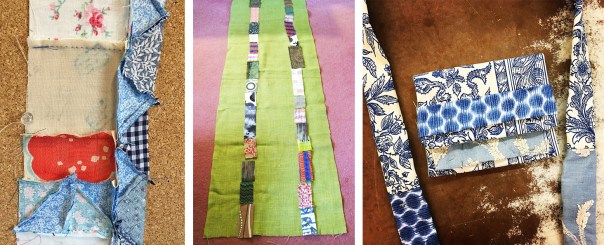
Experimental projects using fabric scraps.
Experimental projects using fabric scraps. From left to right: what will become part of Experimental Art Quilt #2 (still in progress), a table runner that I have used in many art and craft shows, and a purse with strap that I made for a niece as a graduation gift. The purse folds out so that it can be used as either a little clutch purse or a water bottle carrier. The strap is removeable and can be used in different ways.
Old blanket piece with new scrap strips held up against it to see if the colors and patterns look good together.
Left: old blanket piece with new scrap strips held up against it to see if the colors and patterns look good together. Right: an endcap I put together for Schnarr’s Hardware in Webster Groves, MO to showcase some supplies for fun summer craft and home decor projects. I used my refreshed blanket a backdrop for some blank wood succulent shapes ready for painting and decorating. On the other half, I draped a piece of nautical themed fabric. Over both backdrops are hung nautical themed flags that I sewed last summer.
Here is how to start a scrap strip.

Here is how to start a scrap strip. Decide on a color scheme and lay out pieces of fabric to use. Here I decided on a neutral scheme for a future project.

Place fabric pieces good side together, and pin along one edge. Keep going until you have pinned enough pieces to make a strip as long as you need for your project. The first two photos show the same strip from the front first, and then the back, after pinning.

Using a washable fabric marking pen and a ruler, draw a line along one edge, leaving a small seam allowance. Drawing the lines will help you keep your seams straight.

Sew all the pieces together and you’ll have a strip that you can use for many projects.

Temporarily pinned stripes in place on print fabric to see how the colors and patterns look together.
Temporarily pinned stripes in place on print fabric to see how the colors and patterns look together. A fabric pattern that has some kind of stripes or regularly spaced shapes that you can use to line up your stripes will save you a little time measuring and drawing lines on your fabric, but of course any fabric that looks good as a background would work.

I finally finished “Experimental Art Quilt #1!”

A little over two years ago, I was sick for quite awhile with an awful sinus problem. I didn’t have much energy, so to prevent too much boredom I looked for some simple tasks to do. First I sorted all my small fabric scraps by color and organized them into containers. While doing that, I thought it would be fun to challenge myself to see how small a fabric scrap could get before I couldn’t make something out of it. I wanted to upgrade my hand-sewing skills and learn the rudiments of piecing for quilt making.

I started sewing fabric pieces into strips to combine into a scrap quilt later, after seeing some beautiful examples on Pinterest. As I accumulated strips, I combined them with other leftover fabrics such as a jean pocket, a waistband from some corduroy pants, a seam from blue jeans, old clothing tags, ribbon, binding strips, selvage pieces and some rather primitive embroidered panels I made a long time ago for use on a tote bag which has since been retired.

Over the last couple of years, every once in awhile I’d add a little bit more on. Then I finished it with blanket seam binding from JoAnn Fabrics and Crafts where I taught classes in hand sewing, general crafts and jewelry making before the pandemic.

Following are some close-ups of sections of the quilt.

At the top is part of a waistband from some Lime Green corduroy pants.
Here is the top seen a little closer.
Here is a close-up of some stitching. I had some fun adding on some pieces with raw edges and treating some of my stitches like I was drawing on abstract collages in one of my art journals.
On some sections I used the pattern on the fabric as inspiration for how to do the quilting stitching. There are fabrics in this section from one of my old sheets and even a couple of pieces that I printed on with rubber stamps of my own design.
Here is the pocket. The jeans they came from were not mine – I’ve had them in my fabric stash for so long I’m not sure where they came from. The light colored denim pieces tie-dyed with black are from a pair of jeans I dyed and wore in college.
Here is the bottom end. There are fabrics in this section from sewn items my late Mom made in the early 1980s, some more fabric I printed and fabric from the ties and table runners from my wedding! My quilting friend Kate also gave me a lot of beautiful scraps I used in this section.

“Experimental Art Quilt #1” is for sale on Etsy. Here is a link to the listing:

Experimental Art Quilt #1 – Green, Aqua, Blue

Two new posts about me on the Canvas Corp Brands Blog

Yesterday was my two month anniversary of getting married! I’ve been really busy with moving my studio, plants and personal effects and before that working on wedding projects so I’m a bit behind on writing new blog posts and coming up with new projects. However here are a couple of new articles about me on the Canvas Corp Brands blog that you might enjoy:

Crew Interview – Carolyn Hasenfratz

Two of the four table runners that I made for my wedding reception.

The following article was written before the wedding so it makes it sound like the wedding is coming up but it was really in August. The instructions are still good though!

Make a Table Runner With Printed Canvas Squares

Tutorial – Nautical Alphabet Initial Flag Banners


Canvas Nautical Flag Banners
Hand sewn-canvas nautical flag banners with my (former) initials CMH


One of my many DIY wedding projects was to make banners displaying Tom’s and my initials in nautical flag symbols. I made two sets, one with my (former) initials and one with his. To make them I dyed canvas flag blanks from Canvas Corp a lime green background color then appliqued fabric and felt on them by hand sewing with embroidery thread.

To learn how to make them, go to the Canvas Corp blog:
Nautical Alphabet – Initial Flag Banners

For more DIY Wedding ideas, see my Wedding Pinterest Board

Tutorial – Make a Shadow Box From An Old Drawer

Make a Shadow Box From An Old Drawer

It’s a lot of fun to salvage an old drawer and turn it into an attractive and functional shadow box. Last week I taught a class at Schnarr’s Hardware in Webster Groves to show people some creative possibilities for old drawers and give them some ideas for displaying memorabilia. The day after the class we published a tutorial and some video of the class so you can try the project at home.

Read more on the Schnarr’s blog

Sew a Pillow Front From Selvage Pieces

A pillow front decorated with fabric selvage pieces.

Yes, I hand-sewed all those selvage pieces to the front of a blank canvas pillow cover. It’s the third one I did, and I’m in the middle of a fourth one now. Hand-sewing is something I love to do to relax. When I don’t have anything specific to make but I’m in the mood to sew, adding another strip or two is a great soothing activity for me.

Read my tutorial about how to make a pillow like this on the Canvas Corp blog:
Sew a Pillow Front From Selvage Pieces

Make a Wood Plant Tray with Scrap Wood

Wood plant tray made from wood scraps.Several years ago I made a ceramic plant tray specifically to hold three planters that used to be in our bathroom in the 1970s. The tray turned out the perfect size and shape but it got broken so I decided to remake it with scrap wood. There are two planters shaped like fish in the photo above. The third planter is shaped like a frog and it’s in storage so I need to dig it out and display all three planters in this new tray.  Do you want to make a tray like this?

Read more on the Schnarr’s blog:
Make a Wood Plant Tray

Build a Mosaic Plant Stand

Finished mosaic plant stand

In this article I’ll show you how to make a stand to show off a special container plant. Raising a planter off of its surface can really enhance the appearance of a single specimen or help you create an attractive container plant grouping by providing elevation to some containers. Such a stand may also help protect the surface underneath by allowing air circulation under the pot so the surface can dry out between waterings. This stand is designed for both indoor and outdoor use. It is designed to let water from the plants run off, rather than catching it. This stand can also be used as a sturdy trivet indoors or outdoors.

Read more on the Schnarr’s Hardware blog – Build a Mosaic Plant Stand

Stencil a Sofa Shelf Made From Distressed Wood

Sofa shelf made from distressed wood

I had a lot of fun using stencils that I cut to decorate a piece of distressed wood. I made the plank into a shelf for behind my sofa. My living room looks a lot better and I have more room to display some of my favorite plants and Mid-Century Modern collectibles.

Read about it on the Schnarr’s Hardware blog:
Stencil a Sofa Shelf Made From Distressed Wood