
Yesterday my Dad and I went to Hawn State Park in southern Missouri to watch the eclipse. I took my drawing and doodling supplies with me to help pass the time while waiting for the main event. We left fairly early because we knew there would be a lot of traffic and we got there about two hours before the sun started to get covered up. The state park had a nice parking area for us in a mowed field. We had a little picnic and I sat on a blanket doing an eclispe inspired piece of doodle art with colored ink pens and markers.
I am very grateful that I was able to do this. I’ve been in physical therapy for the last several weeks for an arm and wrist injury. I’ve been severely limited in my usual activities for the last couple of months but I’m getting better. I’m slowly adding in my normal activities one by one as I do exercises to get stronger. I’ve added back in crafting, gardening, and now drawing. A week ago my wrist hurt so badly that I could barely address an envelope. This is my first drawing since the injury. I did it without pain and my injury doesn’t feel worse this morning. I’m on the mend and I’m very thankful. I think sewing is the last normal activity to re-try.
When I started this doodle, I knew I wanted to do something inspired by the color wheel. I decided to make each color inspired by a stage of the eclipse. I just doodled whatever came into my mind. As we got closer to totality, I started setting the stopwatch on my phone to go off every 10 minutes – then I’d look at the sun through the eclipse glasses and draw something inspired by that phase.
I kind of had a vague image in my mind of a weird foldout from the Voynich Manuscript as I doodled.
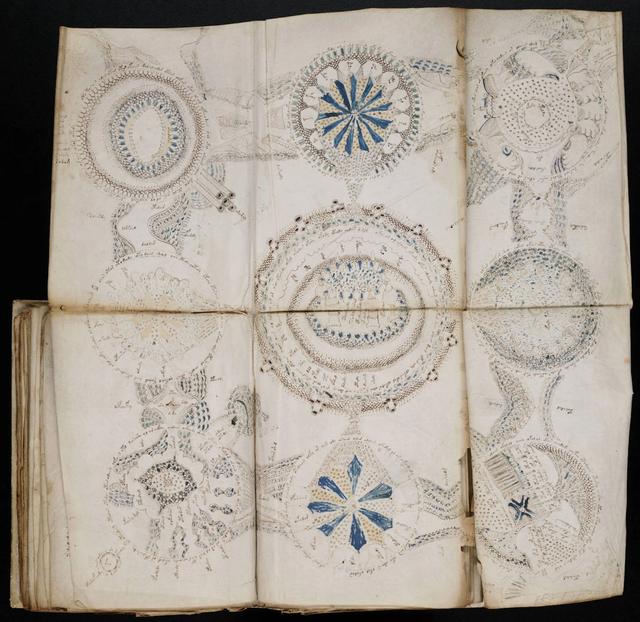
Without looking at a copy of any of the manuscript pages as I drew, I was just trying to get the feel of it, trying to imagine how someone trying to penetrate deep mysteries without the answers that we take for granted now might have reacted.
EDIT 5/15/24: I’m going to have to come back and revise this section. Now that my water garden has grown in a bit more this spring I can see that the cattails sprouted where the Water Willow was last year and what I identified as Water Willow in this article is Cattails instead.
I was also inspired by some plants in our outdoor water garden. I have a small stream as part of our outdoor pond. It acts as part of our filtration system because I run water through lava rock and plants that are in it. One of the plants I grow is a Missouri native called American Water Willow. The stems have really interesting cross sections. I was also thinking about these stems as I was drawing.

Sitting in the warm sun on a perfect day in a beautiful park with my Dad was a treat. And I proved I can draw again so I can resume my plein air drawing group activities and watercolor painting classes that I was taking before I got injured. That’s a big weight off my mind! I also have a class coming up that I’m teaching – my first since the COVID pandemic – and I’m relieved to know I’ll be able to do a good job.
I haven’t wanted to talk about the injury unless I absolutely have to because it’s scary and I was embarassed. For example I wasn’t able to brush my hair and it got so tangled I asked my husband to cut part of it off. I have about four hairs in each follicle for every one that most people have, so my hair dresser has told me. It doesn’t take much for it to turn into an inpenetrable mat. So I was looking like a Harpy Eagle or like I was trying to audition to be in Night Ranger until I got it fixed. I’m slowly getting my life back together and resuming normal activities. That is a relief because I’ve been very stressed out by not being able to do what I normally do. It’s easy to feel isolated if you have an injury. If you ask for help you don’t know if you are going to get helped or attacked because people think you should be getting well faster. It’s humbling and it really makes me have additional empathy for other people who are strugging with something similar, whether permanent or temporary. I’m more grateful than I can say that the therapy is working.


