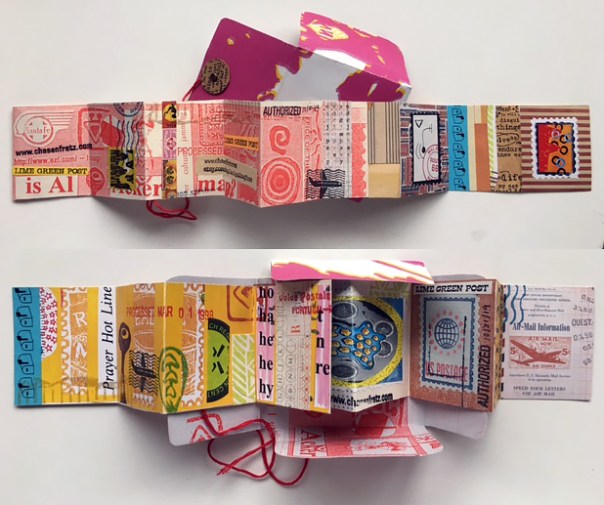
Tag Archives: rubber stamping

Make a Greeting Card With a Star and Arrow

mixed media greeting cards

I designed this project around some collaged stars I had made awhile back while working on my previous tutorial, Making Greeting Cards From Scrap Papers. If you don’t want to make your stars in that style, you can use any paper or cardstock star of your choice.

This card design uses quite a few tools and materials, so if you are going to get them all out you might as well make several. Having extra cards on hand is a real time saver sometimes!

matching_stars_with_card_colors

Supplies:
Cardstock
Assorted small paper scraps
Decorative paper large enough to make envelopes
Tracing paper
Tape, single and double-sided
Pencil
Scrap chipboard
Glue stick
Black rubber stamping ink
Clean scrap paper
Envelope template – free download here for a template that fits a 5.5 inch x 4.25 inch card – Envelope template for Rectangular Card

Tools:
Greeting Card With Star and Arrow Template (free download here)
Paper cutter
Metal ruler
Self-healing cutting mat
Scissors
Rubber stamps with sentiments
Colored pencils
Prismacolor art stix or similar product (like Conte crayons in more than just basic colors)
Sharpie Pen
Sharpie Twin Tip Marker Fine/Ultra Fine
Squeegee or bone folder tool
Rubber stamp Bubble Border Small or other border stamp
Rubber stamp Rounded Squares and Rectangles Border Large or other border stamp
Stencil for the “awesome” arrow – Mini Word Arrows 6×6 Stencil – if you don’t have that stencil, you can use a stamp, stencil or paper of your choice for the small arrow portion of the card.

star_greeting_card_with_arrow

Instructions:

Download and print out my free template, Greeting Card Sketch – Star With Arrow.

Tape tracing paper over the printed out template, and make tracings in pencil over the star portion, the arrows and the shapes on either side of the star.

Write “front” on the tracings before you remove them from the template.

tracings

You’ll use these tracings to transfer your pencil markings onto the the backs of scraps of chipboard to make templates for tracing and masking.

To transfer, place your scrap chipboard pieces face down and flip your tracing paper over so that the back is facing up. Tape in place and go over your pencil lines. When you lift the tracing paper, you’ll have lines you can follow as you cut.

Out of one piece of chipboard, use a utility knife and a metal ruler to cut the two side shapes and the star out.

cutting_from_back

Make yourself templates for the large and small arrows as well.

cut_outs

Put the front of the card on your work surface and tape the stencil/mask over it. With a thin, light pencil outline the star and two side shapes. These light pencil lines will help you line things up in the later steps. Place the large arrow template where you would like it and trace around it too.

outlining_in_pencil

Stamp in black through the mask onto the front of the card, alternating the border stamps you are using.

stamping

Lift the mask to see that portions of the front of the card are partially filling the cut out shapes. This is a technique you can use with stencils or masks you cut yourself or with purchased stencils.

stamped_template_lifted

At this point, you can choose to erase your pencil guide lines, or disguise them by drawing over them with a marker or color pencil. I drew over mine with harmonious colored pencil colors.

green_web

Choose an art stick color and go over your outlines heavily, and the insides of your shapes lightly.

green_web_2

Choose a 1″ x 5.5″ piece of scrap decorative paper in a harmonious color. Fold it lengthwise, apply glue to the back and use it to cover the fore edge of the card.

Trace the large arrow onto a piece of decorative paper and cut it out. Glue it in place on the front of the card.

Take a bright, lighter piece of paper and tape it to your work surface.  Tape your stencil over the paper so that the paper shows through the word “awesome”. Outline the “awesome” arrow and lettering with a black Sharpie pen, then lift the stencil and finish filling in the arrow with the fine tip of a Sharpie double-sided black marker.

awesome

Glue the star and small arrow to the front of the card. Accent the lower and rightmost edges of the star and small arrow with the thick tip of the double-tipped Sharpie marker.

Make an envelope for your card by tracing Envelope template for Rectangular Card onto the back of a piece of decorative paper, then folding it and taping it together. Your’e done!

Low Tech Faux Postage: Part 2

Finished sheet of faux postage stamps made to put on my 2019 Christmas cards.

1. Download and print out the two-page PDF file Low Tech Faux Postage. You’ll use the second page for Part 2. (Part 1 is located here: Low Tech Faux Postage: Part 1)

2. With some light colored markers or colored pencils, color around the outside edge of the faux stamp sheet and inside some of the open areas inside the stamps.

Faux postage printouts colored with pencil and markers.
In the image on the left, I’ve colored on the printout with colored pencils. On the right, I used markers and gel pens with stencils.

3. If you own any rubber stamps with postal type words or sayings on them, get them out and stamp them on some white or light colored paper to make parts to collage onto your stamp designs.

rubber stamping words on paper then gluing them down
Stamp out and glue on postal-related words. Then add border stamps in black ink to frame the composition.

4. Tear or cut the words out and glue one onto each rectangle.

5. Take some border stamps and stamp them in black ink around the composition to make a border. I used some fairly bold stamps because the black rectangles in the original printout are pretty bold and dark so a strong border will help balance the whole composition.

6. Add some color with other rubber stamps from your collection.  I’m currently working on Christmas cards and party invitations so I used some rubber stamps that would fit into use on those kinds of items – either on the actual card or on the envelope.

Faux postage sheets with coloring, collage, stamping and stickers.
My husband Tom made the sheet on the left, and I made the one on the right. I decided after adding stamping that my design needed a lot more pizzazz so I got out some stickers and cut them into pieces to add to my composition.

7. When I make a stamp sheet like this that is designed to be viewed as a whole composition as well as single stamps, I take the original and get color copies made of it. Then I cut out individual stamps from the color copies to use on other projects and keep the original to display intact.

Low Tech Faux Postage: Part 1

stamp sheet collageFaux postage is a really fun mixed media project to make because it’s relatively non-threatening to create tiny works of art in a format that everyone is familiar with. There are lots of craft products you can buy that make it easier to make artwork that looks like postage stamps. A long time ago I designed some rubber stamps for this purpose and some of them are currently for sale in my Etsy shop. You can make this project with any other small stamps that you own also and a selection of paper crafting supplies. Enjoy!

1. Download and print out the two-page PDF file Low Tech Faux Postage. You’ll use the first page for Part 1.

2. Cut out some paper rectangles that are 1 3/4 inches tall and 1 3/8 inches wide from dark paper. You will need at least 16 rectangles.

Cutting rectangles from paper scraps to glue onto faux postage template.

3. Trim the edges with a paper edging scissors and arrange on your Low Tech Faux Postage sheet Page 1. You can think of your sheet as one composition made up of 16 tiny compositions if that helps you to get ideas. Glue down your trimmed paper rectangles.

4. Use a 1″ square paper punch and start by punching out one square for each rectangle from a selection of random scrap papers. Arrange until you are satisfied. If you have similar sized paper punches in other shapes such as circles, feel free to try them out. As you look through your scrap papers, you might get inspired to cut out other shapes. If you are moved to do so, go ahead and cut out whatever you like and glue down on your sheet without worrying about whether or not you’re “inside the lines”.

Paper collage on the template sheet
Paper collage on the template sheet. Mine is on the left, my husband Tom’s is on the right.

5. Take some tiny rubber stamps with words, phrases, numbers or symbols that have to do with philatelic stuff like stamps or cancellations. Stamp them in permanent black ink on light colored pieces of scrap paper. When the ink is dry enough to handle, cut or tear out what you have stamped.

6. Glue the torn or cut pieces to the collage work you’ve already done to help make each rectangle suggest a postal stamp design.

Stamped paper bits glued to collage
Stamped paper bits glued to collage.

7. Continue to add embellishments to your stamps until you think they look finished. Here are some suggestions for what you can add:

More cut collage papers, found or commercial
Stickers
Drawing – paint and gel markers are interesting choices to experiment with because you can write with them on slick surfaces and sometimes dark backgrounds as well
Stenciling
Image transfers
Design tape
Rubber stamping

8. When your stamp sheet is done, you can frame the whole thing to display it, cut apart your stamps to make tiny artworks, make color copies then cut apart the color copies, or put the whole thing in an art journal. Your imagination is the only limit and the most important thing is to have fun!

My Former ‘Zine and Mail Art Days

A black and white collage faux postage stamp sheet I made around 1997.
A black and white collage faux postage stamp sheet I made. I used to get these printed on gummed paper and send them to other mail artists. Circa 1997.

I’ve been out of the Mail Art and ‘Zine scenes for over 20 years now, and to my surprise for some reason I’m getting nostalgic about it and thinking about getting back into it a little bit. I’ve never stopped making faux postage designs, rubber stamped art and Dada-influenced collages, but I stopped networking except through my web site because I got spooked by some of the extreme networkers I was occasionally in contact with. I figured I no longer had the stomach to participate in the “underground”. I mainly was networking for art and creativity and I’m still inspired creatively by what I did back then. I was not in it for anarchy, political change or social change except for some social commentary that I occasionally included.

I think part of the reason I feel like possibly participating again is that when I got spooked, I was in the middle of a couple of Mail Art group projects that I didn’t finish and I never sent out the documentation. I’ve felt guilty about this for a long time. One was called the “Turn Off Your Television Project” and another was called the “Fish Tapestry Project”. After writing the research paper I just published yesterday, I think I might want to finish that documentation and fulfill the obligation I took on myself 20 years ago. I probably won’t be able to get in touch with all the people who participated but I can try.

The Turn Off Your Television Project on display in my 1998 art show "Areas Affected by Shapes".
The Turn Off Your Television Project on display in my 1998 art show “Areas Affected by Shapes”.
A graphic I made to promote the "Turn Off Your Television Project", circa 1998.
A graphic I made to promote the “Turn Off Your Television Project”, circa 1998.

My friend Mark Reed who co-hosted the fish tapestry project with me passed away late last October and it would be a great tribute to him if I could finish that one too someday. I have only this week been able to bring myself to look again at some of his artwork that his family gave to me. I always thought he threw away too much of his old work and I’m glad that I have some of it. I may even finish some of the stuff that is unfinished. We collaborated and shared ideas a lot back in the day. I think he would like that.

Oh how I used to love making animated gif art!

I would be pleased if someone finished my old work after I’m gone. I’d rather have that happen than it be thrown away. I always have a lot of unfinished projects that I take up and put down at various times. I’m sure I’ll be leaving some unfinished ones behind someday. Actually it’s been painful for me to look at a lot of my old work and archives for a long time because so many of the people that I lived that time of my life with are dead. Maybe now I’m finally able to start dealing with the memories. Also I felt like much of my old work was an embarrassing failure. Looking at it now, some of is indeed embarrassing but some of it is not so bad! A former abusive relationship made me feel like I should not do any art because I was no good and didn’t deserve to do it just because it was good for me and made me feel alive. There was a time when I wasn’t sure I was ever going to take it up again.

My 1997 Artist Statement

My 2000 Artists Statement

Here is a faux postage design I made as a computer graphic when I was a beginner at learning Photoshop. 1997.

My Mail Art name was Carolyn Substitute, my ‘zine was called the Lime Green News, and my faux postage was produced under the name “Lime Green Post”. I decided today to do an online search and see if I could find any references to my old Mail Art activities.

If you would like to explore this world I found the following:

John Held Jr. – Collection of Mail Art Periodicals

A Little Introduction to Mail Art

Mail Art Periodicals – MoMA

Links of Mail Art / Visual Poetry

Welch. 1995. Eternal Network. A Mail Art Anthology. Part 2.pdf

Tutorial: Carving Stamps

IDAC Jas W Felter’s “The International Directory of Artistamp Creators”

The Translinguistic Collaborative Poetry of Serge Segay, Rea Nikonova, and John M. Bennett – I can’t find specifically why my search turned up this web site but I did used to correspond with a couple of the people mentioned here so maybe a deeper search would be fruitful!

ArchivesSpace at the University of Iowa – Looks like they have at least a few issues of the Lime Green News in their archives.

stardust Memories Mail-aRt-Links and projects – bless this person for putting a link to my old web site on archive.org! I haven’t seen it in so long. I redesigned it in 1999 and I don’t think I looked at the old one since then because it made me so embarrassed!

cbanle

Lime Green Evolution World of Art – 1997-1999 – My first web site, how I transitioned from analog networking to digital networking. Thinking back on it, printmaking class in 1987 led to rubber stamping, rubber stamping led to Mail Art, Mail Art led to ‘zines, ‘zines led to taking a class to get better at desktop publishing, which led to published a web site, that led to being a web designer, which led to doing marketing which led to me working on a marketing degree. No wonder I called my first web site Lime Green Evolution. And I didn’t even put in all the other tangents I followed along the way! I used to stay late a lot after my web design job ended at 5 pm to work on my personal web site and wait for the traffic to die down.

One of the things we are studying in my Mass Communications class is how people make media meaningful for themselves. Back in the ‘zine / grunge / Mail Art era we used to do a lot of collages, small press publications and mixed media projects. I’m sure there are still people out there doing these things and with technology we have a lot more options available. Most likely I’ll be exploring this in a future research project.

Edit: here is my new page on the International Union of Mail-Artists web site. I’ll be putting some old and new work there.

Carolyn Hasenfratz Winkelmann

Make Nautical Thank You Cards

thankyoucards_nautical_finished

While making items for my wedding last summer I used a lot of nautical themed papers made by Canvas Corp. I saved a lot of the paper scraps to use in one of my favorite card-making techniques. I like to glue paper scraps onto narrow strips of scrap cardstock then apply rubber stamping ink to the edges to unify the strips. They make interesting parts to use in all kinds of paper crafts. I’ve previously written other articles that show this technique in action.

Pretty Packaging for Mason Jar Candles
http://blog.canvascorpbrands.com/quick-easy-pretty-packaging-mason-jar-candles/

Making Greeting Cards From Scrap Papers
http://www.chasenfratz.com/wp/making-greeting-cards-from-scrap-papers/

Materials and Tools
Canvas Corp paper sheet Sand & Sea Art Pages on Kraft CCP2883
Assorted paper scraps with a nautical theme, mostly from collections by Canvas Corp
Scrap cardstock
Black permanent rubber stamping ink
Permanent rubber stamping ink in colors that complement the project
Strips of light colored scrap paper that harmonize with the chosen paper scraps
Pieces of cardstock that harmonize with the chosen paper scraps
Clean scrap paper
Scissors
Glue stick
Paper cutter
Computer with scanner and graphics software
Eraser for stamping the edges of the paper

materials_1

These very detailed strips tend to look good in designs next to areas with less detail. To make thank you cards to acknowledge wedding gifts and other help people generously gave us for the wedding, I made some scrap paper strips edged in red and scanned them for use in a digital file which I had printed on cardstock at a copy shop. I spelled out the word “THANKS” in nautical flags by making little flag collages with Canvas Corp nautical themed papers and scanning those as well. After digitally manipulating the scanned paper pieces, this is the digital card design I came up with.

thankyoucard2_web

The red-edged strips that I scanned were now free to use in actual handmade cards and not just the digital design. I decided to combine the strips with imagery from the Canvas Corp paper sheet Sand & Sea Art Pages on Kraft CCP2883. The six images on the paper sheet are just about the size of the cards I want to make and the subtlety of the designs will really set off my paper strips. I decided to make six 5.25″ x 4.25″ cards. I selected six pieces of cardstock and cut them to 5.25″ wide and 8.5″ long then folded them in half to make the cards. Next I selected strips of light colored paper in colors that harmonized with my color scheme and stamped the sentiments “just a note” and “thank you” with black permanent ink. I made more strips than I thought I would need so that I would have lots of options. Also, I can use the extras for making other cards and for the card making classes that I teach.

stamped_paper_strips_web

To begin assembling the front of the cards, I cut each of the six images on the sheet Sand & Sea Art Pages on Kraft to just a little bigger than the card front. I cut the image in two then I inserted a strip with the words “just a note” then a scrap strip edged in red between the two pieces of the image. I glued the parts to the front of the card with a glue stick then trimmed away the excess. Then I glued the circular paper punched out piece with the stamped words “Thank You” onto the front of the card.

assembling_card_front

Introduction to Letterboxing

Letterboxing logbook and samples of personal stamps
Letterboxing logbook and samples of hand carved personal stamps.

I recently taught a two-part class to help people get started in the hobby of Letterboxing which combines outdoor exploration and creative expression. Two of the items you need to participate are a rubber stamp and a logbook. In part one, we hand carved a personal stamp and in part two we made a personal logbook. I wrote a tutorial for each class and they are now published on the Schnarr’s Hardware blog. If you want to try letterboxing or just learn to carve a rubber stamp and make a simple handmade book, here are links to my tutorials.

Read more on the Schnarr’s Hardware blog:

/Introduction to Letterboxing – Part I – Carving a Personal Stamp

Introduction to Letterboxing – Part II – Making a Personal Logbook

Make St. Patrick’s Day Cards

St. Patrick's Day Cards
Everyone is Irish on St. Patrick’s Day! Wish good luck and celebrate spring by making St. Patrick’s Day Cards!

Supplies and Materials
Cardstock and a variety of decorative papers in shades of green
Downloadable templates “St. Patrick’s Day Card 1” and “St. Patrick’s Day Card 2”
Scoring tool
Tracing paper
Chipboard (can be scrap – for making templates)
Flower punch
Small circle punch
Paper flower embellishments
Eyelets
Eyelet setter
Metal ruler
Craft knife and blades (X-Acto or something similar)
Cutting mat
Pencil
Eraser
Rubber stamps (St. Patrick’s Day, appropriate greeting, Celtic designs, spirals)
Stamping ink pads and re-inkers in the following colors: dark brown, shades of green
Acrylic stamp mounting blocks
Double-sided tape
Paper cutter
Awl or needle tool
Small hole punch
Scissors
Decorative scissors
Glue stick
Masking tape
Hammer
Decorative brads
Optional – buttons, white craft glue such as Turbo Tacky Glue, needle, thread

The first part of the process for the pair of cards is to stamp out St. Patrick’s Day and Celtic motifs onto small pieces of scrap paper. Use stamping inks in various shades of green and dark brown. Mix in some neutrals if you want. You can make the backgrounds more interesting with the use of background stamps or techniques such as brayering.

Once you have a quantity of stamped pieces finished and the ink is dry, gather them together with some scraps of paper in various shades of green. Make a collage by gluing these scraps down with a glue stick onto a 1/2 sheet of white cardstock. You can create interest by cutting the scraps into smaller pieces by tearing while using a ruler as a straight edge or by cutting apart with decorative scissors. Burnish your collage periodically with a bone folder under a piece of clean scrap paper so the glue has a nice tight seal. Set aside for now and let the glue dry.

Collage made with scrap paper and paper pieces that I stamped with rubber stamps.

Directions for St. Patrick’s Day Card #1

St. Patrick's Day Greeting Card

1. Download and print out the template “St. Patrick’s Day Card #1”.

2. Cut a 8.5 x 5.5″ size piece of card stock to use as the background of your card. Score it  and fold it in half.

2. Trace the shamrock from the template onto the back of dark green decorative paper. Cut out the shamrock with scissors. If you want to make several cards, you can trace the shamrock onto chipboard and cut it out to use multiple times for tracing.

3. Trace the half-leaf shape onto chipboard and cut out. Trace onto four different pieces of decorative paper in different shades of green. Instead of pre-made decorative paper you can use some parts of your collage if you want (if you do this be sure to leave at least a 3 7/8″ x 5 1/8″ sized piece intact to use on card #2). Glue the half petals in place as shown on the card sketch in the PDF file.

4. Cut out a narrow strip (3/4″ wide) of light colored paper and stamp or glue a sentiment onto it. Glue this onto a slightly wider (1″ wide) paper strip. Glue to front of card and trim.

5. Glue the shamrock down in place on the front of the card.

6. Punch out a flower shape with a punch and glue down in center of shamrock.

7. Punch out a small circle and glue in place on the strip near the bottom of the card.

8. Punch two holes for eyelets in the center of where the two flower embellishments will go. You can use a small hole punch or a needle tool or awl to start the hole. If the hole is not large enough to accept the eyelet you can enlarge the hole with paintbrush handle or other handy tool.

9. Push the eyelets through the holes and set with the eyelet setter.

Variation – use buttons as embellishments instead of the paper flowers. Attach by gluing with white craft glue then further secure by sewing.

Directions for St. Patrick’s Day Card #2

St. Patrick's Day Greeting Card

1. Download and print out the template “St. Patrick’s Day Card #2”.

2. Cut a 8.5 x 5.5″ size piece of card stock to use as the background of your card, score it, and fold it in half.

3. Cut out a 3.75 x 5″ size piece of dark green cardstock.

4. Trace the shamrock from the template onto the back of the dark green cardstock. Cut out the shamrock with a craft knife. If you cut carefully, you can use the cutout to make another card. If you want to make several cards, you can save your first cutout and use it multiple times for tracing.

5. Get your collage out and cut a 3 7/8″ x 5 1/8″ size piece out of it. Position your dark green cutout piece over it and place those on top of your folded cardstock card base. Make sure the three layers line up correctly. If you decide you want a sentiment or other embellishment in the lower left area where there is some space, now would be a good time to add it.

6. Using the printed out template as a guide, poke holes in all three layers with an awl or needle tool.

7. Push decorative brads through the holes and spread prongs on the back side. You’re done!

Some of the rubber stamps and papers I used in this project are by 7gypsies by Canvas Corp Brands and Inkadinkado. The “Good Luck” stamp is by Carolyn Hasenfratz Design and the celtic and spiral stamps are hand carved by me.

If you would like to make envelopes for these cards here is a template that will fit:
http://www.limegreennews.com/documents/templates/envelope_template_rectangular.pdf

Extra tip: If you have heart punches or stencils, you can make a three or four leaf clovers for yet more cards from three or four heart shapes!

See my Pinterest site and past lesson plans for ideas and craft projects.
https://www.pinterest.com/chasenfratz/
http://www.limegreennews.com/lessons.html

Using paint as a background for journaling pages

I recently made some abstract painted backgrounds for a class I’m going to be teaching at JoAnn Fabrics and Crafts. I will be demonstrating how to make mixed media pages for journaling with acrylic paint, watercolor paint, assorted markers and Fiskars gel pens. I embellished my sample pages further with decorative scrapbooking paper, stickers, paper tape and rubber stamps. The binding rings I used in these samples are by 7gypsies.

On the left is one of the pages I painted with acrylic paint using a water wash technique. Besides some painted paper scraps, on the right I also used some scrapbooking paper, decorative paper tape, and a word from the rubber stamp set “B Journal Stamps” by Teresa Collins.
I emphasized a paint splotch with a die-cut circle embellished with gel pen doodling. On the right side page I used a couple of Heidi Swap stickers over some doodled circles and small die-cut circles. The paper patterns and colors in the paper pad The Everyday Essentials Stack by DCWV blend really well with the painted backgrounds so I used a lot of designs from that stack in this project.
Product used on these pages: markers, gel pens, Heidi Swapp stickers, punched out paper shapes, Everyday Essentials paper, Mrs. Sparkle & Co. planner stamps.
Product used on these pages: translucent vellum scrapbooking paper with gold designs, Heidi Swapp Stickers, B Journal Stamps, markers and Everyday Essentials paper.
Product used on these pages: markers, B Journal Stamps, paper tape.
Product used on these pages: Everyday Essentials paper, B Journal Stamps, paper tape, punched out paper circles, markers.
Product used on these pages: Mrs. Sparkle & Co. planner stamps, paper tape, Heidi Swapp Sticker, a sheet from the stack Heidi Swapp Memory Planner Journaling Pages, punched out card stock circles.
Product used on these pages: B Journal Stamps, Everyday Essentials paper, markers, Heidi Swapp sticker, a cut up Heidi Swapp journaling page, punched out circles.
Product used on these pages: Punched out circles, a cut down Heidi Swapp journaling page and sticker, B Journal Stamps, Mrs. Sparkle & Co. planner stamps, metallic paper tape, markers, Everyday Essentials paper.
Product used on these pages: Everyday Essentials paper, gel pens, markers, translucent vellum paper with metallic designs, Mrs. Sparkle & Co. planner stamps, punched out circles, B Journal Stamps, paper tape Heidi Swapp stickers..

I hope these samples inspire you to take a class with JoAnn or experiment with mixed media journal and planner pages on your own!

See these Pinterest Boards for more ideas:

Planners, Journals, Albums, Scrapbooks and Handmade Books

Art Journaling

Handmade greeting cards with geometric designs

Handmade greeting cards made with hexagon paper punches

To design these handmade cards, first from assorted paper scraps I punched out a whole bunch of hexagons in two sizes. I used a lot of geometric patterns and for extra interest some vellum paper printed with black and gold designs. Then I cut out some 1″ wide strips of paper and stamped on the the word “congratulations” from a rubber stamp set made by Tim Holtz.

To the front of my cards, I added other paper accents then glued everything down with glue sticks. I’m pleased with how a touch of translucency here and there from the vellum paper helps add some depth and interest to the simple card designs.

The cards you see here are currently offered for sale in the shipping department at Schnarr’s Hardware in Ladue, MO.

Mixing Different Paper Crafting Brands Together

Paper crafting supplies include things you use in scrapbooking, rubber stamping, journaling, card making, planners and more. Paper craft companies make coordinated lines of products that are designed to look great together. Recently I made samples for a promotion at JoAnn Fabrics and Crafts in which I used only products sold in their store. Within that criteria I did a little mixing of brands. I’m continuing to work on the journal prototype because I’m still having major fun with it. I’m developing some templates to help combine the Heidi Swapp journaling products I was demonstrating with making a custom planner. I’m bringing in more product that I already own from other brands. It’s challenging to get the different product lines to harmonize together but it’s satisfying and fun too. I’m getting some results that please me, anyway!

Heidi Swapp journaling pages and stickers.
In the center are some Heidi Swapp journaling pages and stickers. I picked out product from my stash that I thought might blend well. The Heidi Swap product line is pretty easy to blend because it includes both geometric and floral motifs. My layouts can go in either a traditional or modern direction – or I can attempt to blend the two as the Heidi Swapp designers have done. I looked for similarities in colors, shapes and patterns.
Samples of Journaling Page Layouts
Brands I mixed on these pages include Heidi Swapp, Tim Holtz, Project Life, Fiskars and DCWV. On the right side I made a pocket out of kraft card stock and a cut-down Project Life card, embellished with vellum paper, stickers and paper tape.
Journaling Page Layout Samples
Heidi Swapp journaling pages with Tim Holtz paper tape and miscellaneous papers cut with a hexagon punch by Creative Memories. Making some of the hexagons blank gives the design breathing room and also space for small stamps, stickers or writing later. The black binding rings are by 7gypsies.
Journaling Page Layout Samples
Again using Heidi Swapp journaling pages as a base, I found some harmony between a Project Life card and some Tim Holtz paper and paper tape. I want to go on a road trip now so I can write on these pages and add some photos!