Art journaling is an activity that helps me a lot with self care, artistic expression and just general management of life. Lately I’ve been experimenting with combining some artistic expression with material I’m learning in Social Engineering class. There are a lot of acronyms and concepts to remember – things that lend themselves well to bullet journals, art journals and chart and graph type graphics.
These pairs of pages you will see are in progress. I made them to have something to do adult coloring and other paper craft based activities on when I want to relax and be creative for a bit. As I work I can study and memorize the “bullet points”. I’m going to erase some of these pencil lines as I go. For a couple of the more complicated layouts I made drawings on tracing paper and chipboard templates to help cut the paper pieces to the right sizes and shapes.
Some of the stencils I used are commercial products I sell in my online Etsy shop. If you would like to see the selection, it’s at this link: Stencils and Stenciling Supplies.
I hope these pages in progress will give you some ideas for organizing information in a creative and fun way!
Two-page spread for MAPP – Mitigation and Prevention Plan.Here is a pair of pages I began to create my rendition of “Curtis’ Triad of Disruption”. I love geometric shapes, and trios. This will be fun to work on!I finally finished “Triad of Disruption” on 12/30/22! I did a couple of things a bit different than I planned.Social Engineering Pyramid two-page spread on tracing paper and then started in the art journal.Finally finished coloring these two art journal pages.
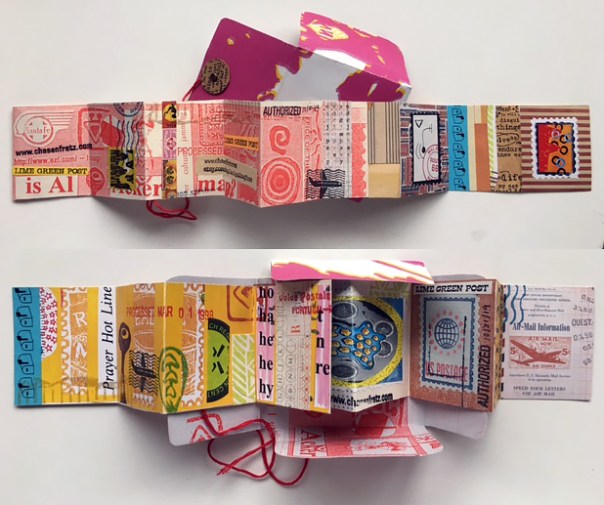
Photo by Carien Van Hest. Both sides of the mini accordion book I sent her with its two-sided envelope.
Back in 2019, I made a couple of square mini accordion books, 2″ x 2″ in size when folded up. While sending out my 2020 Christmas cards, I finally made envelopes for holding four of them and I sent them out to a few people in my Mail Art network. Here is an article I wrote about how I made that batch of little books – Made From Scraps: Mini Accordion Books.
In the spring of 2020, shortly after the pandemic started, my husband Tom and I started hosting a #virtualartparty online for several weeks in a row to help ourselves and people we know cope with loneliness and anxiety. During the second session, I demonstrated how to make these little accordion books since they can be made from scraps and supplies many people already have around the house. At the end of this article is the archived video of that accordion book session. I started two books that afternoon, which I finally finished recently.
The image below shows the first book, titled “The Wonder of Life”. The top two images are of each side semi-folded. Below that are some close-ups of different sections of the book. To make these mixed media collage compositions, I combined found paper scraps, rubber stamping, design tape, stencils, marker drawing, and image transfers made from clear packing tape. Here is an article I wrote about how to make the image transfers – Art Journaling With Stencils and Image Transfers.
Mini book by Carolyn Hasenfratz Winkelmann called “The Wonder of Life”.
The next image below shows several examples of image transfers I was making next to sections of the stretched out accordion books that I was trying to coordinate with. I knew I would not know exactly how the semi-translucent transfers would look when they were laid over the underlying paper collage, but to make sure they were at least somewhat harmonious I looked for images for my transfers that reflected the colors and shapes of images I used in my first layer.
Coordinating transfer images to lay over collaged images.
I made a template for an envelope to fit the books or any thin 2″ x 2″ object for people to download and use to make an envelope for their book if they so wished.
Mini Book Envelope Template
I used the above template to trace two envelopes onto cardstock. I cut the envelopes out and made folds where the dotted lines are in the template so that the envelopes would be thick enough for the little books. With a circle punch I cut little circles to use for making a string closure. I made extras knowing I was going to put transfers on these circles – I wanted to be able to choose from several to get ones that looked good with the finished envelopes.
My next step was to paint the fronts and backs of each envelope with clear acrylic medium, letting the medium dry before I flipped them over to coat the other side. This step was for three purposes – to increase durability, to reduce wrinkling when I later applied layers of transfers and paper, and to make the paper more receptive to the slick tape transfers. When all was dry, I applied transfers to the outsides of the envelopes using clear medium as the glue and burnished them well to remove any air bubbles. After they were dry I trimmed the transfers to the edges of the envelopes.
Applying tape transfers to cardstock envelope. Envelopes after trimming.
For the insides of the envelopes, I used the acrylic medium to laminate a pieces of paper with a matte finish to the insides of the envelopes. I wanted a matte finish for the insides instead of a shiny finish so that the envelopes would not stick to the books when stored.
The final steps in finishing the book covers were to attach the small cutout discs I made earlier with small brads, and wind embroidery thread around the discs to make a string closure.
Tom and Carolyn made this as part of #paintforpeace in #ferguson MO on June 6-7.
I have never lived in Ferguson, MO but I have a lot of ties there. I worked there for several years. I went to school there for several years (yes I know STLCC is a two-year college but it took me longer than that – plus I took continuing ed classes for many years afterward). I know how hard the people of Ferguson have worked to create a nice business, dining and entertainment district. I’ve had several of those businesses as clients over the years and have been a customer at many others. A couple of my best friends lived there. I don’t like to see any community torn by violence but of course it’s extra emotional when it’s one that I am familiar with.
I believe the arts can heal and I believe that gardens can heal. That’s why I’m a Master Gardener and why I’ve been having my #virtualartparty online. When I saw that a friend of mine that I respect for her art ability, spiritual commitment and community spirit was participating in #paintforpeace in Ferguson, I wanted to put my beliefs about the healing power of art to the test. This past weekend I painted one panel along the main drag of Ferguson to make my contribution and to see what would happen. My husband joined me for one of the two days I was there and helped me paint a panel. If you have any questions about what we experienced or opinions about the project please feel free to ask and comment.
The theme for #virtualartparty Thursday, June 11 is Public Art. #paintforpeace is a form of public art that is intended to have a specific function. There is also a lot of other public art in the news lately – statuary and monuments from US and World History. There are monuments that are being targeted because they cause offense and make people feel unwelcome, and there are others that I theorize are being targeted to get footage of statues being toppled in the hopes of inciting fear and anger and sparking a violent revolution of our form of government. George Washington, Winston Churchill, Ghandi, Queen Victoria, Thomas Jefferson and Abraham Lincoln are all under attack and if continued we in the US and any part of the world influenced by European culture will see a Cultural Revolution to rival past events in history. Has anything good ever come from that? Please give your opinion.
Although it is not perfect I still support the Democratic Republic form of government and the US Constitution. I predict public art is going to be in the news for a long time to come. In between questions and comments, if we get any, my husband Tom is going to read selections from the following books. I chose these books because they were on my shelf and convenient, and also had something interesting to contribute to the public discourse about public art and public spaces. I have a HUGE book collection (seems pretentious to say “private library” but I guess that’s what it is) and I need to dig into it more often. It’s very illuminating, and I also find it calming to know that the issues we wrestle with today are not new and people have the ability to persevere through a lot of tough times.
Book selections for June 11, 2020:
“The Expressive Arts Activity Book: A Resource for Professionals” by Suzanne Darley and Wende Heath, 2008. Pages 60, 68.
“American Signs: Form and Meaning on Route 66” by Lisa Mahar, 2002. Excerpts from pages 186, 189, and 190.
“A History of the American People: Volume One: To 1877” by Stephan Thernstrom, 1984. Excerpts from pages 358, 372, 377-379.
“Parks, Plants and People: Beautifying the Urban Landscape” by Lynden B. Miller, 2009. Excerpts from pages 65-66.
“Keith Haring: The Authorized Biography” by John Gruen, 1991. Excerpts from pages 68-69, and 98.
“St. Louis: Portrait of a River City” by Elinor Martineau Coyle, 1966. Excerpts from pages 56, 66-69, 82, 128.
“Arts and Ideas”, Seventh Edition by William Fleming, 1986. Excerpts from pages 86-87.
“The Visual Dialogue: An Introduction to the Appreciation of Art” by Nathan Knobler, 1966. Pages 238, 261-263, 289.
If you have book, article, or art recommendations, please post them! I’m going to be posting more after tonight’s discussion because there is enough material to stay on this topic for quite awhile. I might even want to turn this into a project for my Master’s Degree at Webster University, if I don’t get expelled first for “thoughtcrime”.
Update June 12, 2020
Ok, here is how last night’s video turned out.
#paintforpeace in Ferguson organizers video:
They are promoting the hashtag #wehearyou so I’m going to start adding that to related stuff in social media.
Listening and hearing I think are some of the key things I’ve learned from this healing experiment. We live in a “gotcha” culture and everyone is quick to see and pounce on the flaw in someone’s reasoning rather than trying to understand how they got to where they are in their thinking. People in our society today have an average attention span of 8 seconds which is less than that of a goldfish which is 9 seconds. Is it any wonder that the humanity part of being human seems to be hard to find? Understanding and healing takes patience and work, but we are being pushed to instantly judge someone to see if they fall into one category or another so their concerns can be dismissed. If you treat people like that for decades you can’t earn trust back in an instant. Have we all examined ourselves to see if we are worthy of trust? That’s what we have to do first before we judge someone else for getting the wrong idea about us and writing them off as not worth trying to engage with.
Of course there are those who have ill intent and want to sow hate and violence to achieve their destructive goals and sometimes they hide those goals under a facade that seems benign. I believe in letting people show you who they are with their behavior before you judge. I don’t blame people for not knowing who it’s safe to trust. I try not to take it personally and use patience and love to “give peace a chance”. You might get burned, but you might find something beautiful. We have to accept that we aren’t always allowed to have peace but where we can have it I like to try it first.
Here is an amazing video I watched the other day. It’s called “Before You Call the Cops”.
I designed this project around some collaged stars I had made awhile back while working on my previous tutorial, Making Greeting Cards From Scrap Papers. If you don’t want to make your stars in that style, you can use any paper or cardstock star of your choice.
This card design uses quite a few tools and materials, so if you are going to get them all out you might as well make several. Having extra cards on hand is a real time saver sometimes!
Supplies:
Cardstock
Assorted small paper scraps
Decorative paper large enough to make envelopes
Tracing paper
Tape, single and double-sided
Pencil
Scrap chipboard
Glue stick
Black rubber stamping ink
Clean scrap paper
Envelope template – free download here for a template that fits a 5.5 inch x 4.25 inch card – Envelope template for Rectangular Card
Tools:
Greeting Card With Star and Arrow Template (free download here)
Paper cutter
Metal ruler
Self-healing cutting mat
Scissors
Rubber stamps with sentiments
Colored pencils
Prismacolor art stix or similar product (like Conte crayons in more than just basic colors)
Sharpie Pen
Sharpie Twin Tip Marker Fine/Ultra Fine
Squeegee or bone folder tool
Rubber stamp Bubble Border Small or other border stamp
Rubber stamp Rounded Squares and Rectangles Border Large or other border stamp
Stencil for the “awesome” arrow – Mini Word Arrows 6×6 Stencil – if you don’t have that stencil, you can use a stamp, stencil or paper of your choice for the small arrow portion of the card.
Tape tracing paper over the printed out template, and make tracings in pencil over the star portion, the arrows and the shapes on either side of the star.
Write “front” on the tracings before you remove them from the template.
You’ll use these tracings to transfer your pencil markings onto the the backs of scraps of chipboard to make templates for tracing and masking.
To transfer, place your scrap chipboard pieces face down and flip your tracing paper over so that the back is facing up. Tape in place and go over your pencil lines. When you lift the tracing paper, you’ll have lines you can follow as you cut.
Out of one piece of chipboard, use a utility knife and a metal ruler to cut the two side shapes and the star out.
Make yourself templates for the large and small arrows as well.
Put the front of the card on your work surface and tape the stencil/mask over it. With a thin, light pencil outline the star and two side shapes. These light pencil lines will help you line things up in the later steps. Place the large arrow template where you would like it and trace around it too.
Stamp in black through the mask onto the front of the card, alternating the border stamps you are using.
Lift the mask to see that portions of the front of the card are partially filling the cut out shapes. This is a technique you can use with stencils or masks you cut yourself or with purchased stencils.
At this point, you can choose to erase your pencil guide lines, or disguise them by drawing over them with a marker or color pencil. I drew over mine with harmonious colored pencil colors.
Choose an art stick color and go over your outlines heavily, and the insides of your shapes lightly.
Choose a 1″ x 5.5″ piece of scrap decorative paper in a harmonious color. Fold it lengthwise, apply glue to the back and use it to cover the fore edge of the card.
Trace the large arrow onto a piece of decorative paper and cut it out. Glue it in place on the front of the card.
Take a bright, lighter piece of paper and tape it to your work surface. Tape your stencil over the paper so that the paper shows through the word “awesome”. Outline the “awesome” arrow and lettering with a black Sharpie pen, then lift the stencil and finish filling in the arrow with the fine tip of a Sharpie double-sided black marker.
Glue the star and small arrow to the front of the card. Accent the lower and rightmost edges of the star and small arrow with the thick tip of the double-tipped Sharpie marker.
Make an envelope for your card by tracing Envelope template for Rectangular Card onto the back of a piece of decorative paper, then folding it and taping it together. Your’e done!
2. With some light colored markers or colored pencils, color around the outside edge of the faux stamp sheet and inside some of the open areas inside the stamps.
In the image on the left, I’ve colored on the printout with colored pencils. On the right, I used markers and gel pens with stencils.
3. If you own any rubber stamps with postal type words or sayings on them, get them out and stamp them on some white or light colored paper to make parts to collage onto your stamp designs.
Stamp out and glue on postal-related words. Then add border stamps in black ink to frame the composition.
4. Tear or cut the words out and glue one onto each rectangle.
5. Take some border stamps and stamp them in black ink around the composition to make a border. I used some fairly bold stamps because the black rectangles in the original printout are pretty bold and dark so a strong border will help balance the whole composition.
6. Add some color with other rubber stamps from your collection. I’m currently working on Christmas cards and party invitations so I used some rubber stamps that would fit into use on those kinds of items – either on the actual card or on the envelope.
My husband Tom made the sheet on the left, and I made the one on the right. I decided after adding stamping that my design needed a lot more pizzazz so I got out some stickers and cut them into pieces to add to my composition.
7. When I make a stamp sheet like this that is designed to be viewed as a whole composition as well as single stamps, I take the original and get color copies made of it. Then I cut out individual stamps from the color copies to use on other projects and keep the original to display intact.
When matting artwork, it’s common to have a lot of mat board scraps left over. I had a number of scraps that were large enough to make small open top storage boxes. If you would like to make one similar, here is how I did it.
You will need:
5 square mat board pieces of equal size
An assortment of collage papers
An assortment of tools for decorating paper – I used stencils, rubber stamps, paint, printmaking ink, markers and colored pencils Yes Paste
Clean scrap paper Bone folder or Squeegee multipurpose tool
Old credit card or your favorite glue-spreading tool Acrylic medium
Paint brush Tim Holtz Idea-ology Metal Box Corners – they come in a package of 8 and you’ll need 4 corners per box
Pencil
Awl
Chunk of old wood
Metal corner braces
Old belts or strips of leather or faux leather Metal brads
First take your five mat board pieces and decorate both sides with collage papers combined with the paper embellishing techniques of your choice. Use water resistant inks because you’ll be applying acrylic medium over your collages later. Yes Paste is my favorite glue for sticking down large pieces of paper that have to look flat and free of wrinkles. I apply the glue with a credit card to get a nice thin layer then after laying down the paper piece I’m gluing I put a clean piece of scrap paper on top and burnish with a bone folder or Squeegee tool to get a tight, flat seal.
While working on this project at Perennial, another member asked me where I get my paper ephemera. The short answer to that question is that I’ve been collecting papers since the year I first got turned on to making collages – 1985! A more involved answer is to suggest some of the following sources of interesting papers:
Old magazines and catalogs.
Is someone you know doing some major cleaning? Offer to help in exchange for keeping interesting papers. This is a good way to get old graphic design samples, newspapers, books, maps, photos, negatives, stamps, envelopes, tickets – all kinds of neat stuff.
Save your art and paper craft “failures” and experiments. Whenever you have extra paint or ink, add a little more embellishment to your scraps until you get something you like. Toward the end of this article are examples of some great results I got using this method – Fun With Stencils.
Check thrift stores, estate sales, garage sales, flea markets, etc.
Shop a teachers resource recycling center like Leftovers, etc.
Make your own with any paper technique that you like, or a combination of techniques, such as rubber stamping, stenciling, painting, printing, making paste paper, rubbings, handmade paper, computer printouts, cyanotypes or drawing.
Use the decorative paper pads commonly sold for scrapbooking. There are designs for every taste and decorating style.
When you are satisfied with your designs, brush both sides of your mat board pieces with acrylic medium for durability and let dry.
Next start assembling your box from the bottom up, using the box corner hardware and the metal brads included in the package. Use a pencil to mark where the holes go and punch out the holes with an awl. An old chunk of wood is handy for protecting your work surface from the awl point. Be carful with the awl and aim it away from yourself while pressing down and through. Push brads through holes and spread the tines from the inside of the box to assemble the four bottom corners.
At this point the top four corners are loose and flapping so you’ll need something to stabilize them and keep your box shaped like a cube. At Perennial I rummaged through the spare hardware bins and found a couple of metal corner braces which worked wonderfully when attached with brass brads. There were only two available so I looked for something else for the other corners. You can buy metal corner braces at a hardware store and use them on all four top corners if you like.
Storage box with pieces of old belts attached to some of the corners with metal brads
At Perennial there is a box of old belts and belts have holes! Idea! I selected some to cut down and use on the other corners. Attached with brads, they work well with the “grunge” look of my boxes. If you lack old belts, you can use a variety of materials that can be cut into strips and have holes poked in it – plastic from old lids, scraps of faux leather, scraps of real leather, thin metal – what do you have lying around that you want to try?
I had a lot of fun using stencils that I cut to decorate a piece of distressed wood. I made the plank into a shelf for behind my sofa. My living room looks a lot better and I have more room to display some of my favorite plants and Mid-Century Modern collectibles.
Build an attractive garden home out of wood for native bees and other valuable pollinating insects. We will paint our homes to make them pretty and decorate some of the surfaces with stencils. All materials except the bamboo segments shown in the picture will be included. The wood will be cut ahead of time. The skills you will use in the class are: sanding, nailing, painting and stenciling. You will be instructed on what kinds of materials to fill the house with. The bamboo shown in the picture is one option you can use but there are others.
Class Title: Build a Pollinator House When: June 04, 2016 from 1:00pm to 4:00pm Where: Studio:art 7403 Manchester Rd., Maplewood, MO 63143 Map & Directions Price: $40.00.
Painting and stenciling terra-cotta pots is a fun and inexpensive way to enhance your patio or garden decor. Younger and older crafters alike can join in. Small decorated pots can be used as party favors. Medium-sized pots might provide the base for a table centerpiece. A large pot could function as a gift basket that you can fill with items for a loved one who likes gardening. Gardeners can always use extra small items such as gloves* (they tend to wear out with regularity), seeds*, bulbs*, bug repellent*, gardener’s soap, hand lotion*, sunscreen*, lip balm* and plant tags*. You can also throw in a gift card* so they can get exactly what they want!
Here are the results of what has become an annual ritual for me – designing a card to celebrate the New Year!
New Year Card for 2016
This year there are three versions of the card – see my Pinterest board for a peek at the other two variations.
Making these designs was kind of an involved process. The first thing I did was go through some monoprints I did back in the 1990s that I thought would make good backgrounds. These prints were “rejects” that I didn’t think were interesting enough on their own but I thought might be good as part of a collage some time in the future. Next I used some archival dye-based ink (Ancient Page and ColorBox Archival) to stencil designs on top of the background pieces. I chose this ink because it was translucent and I wanted the backgrounds to show through a little. Most of the stencils I used on the backgrounds were from a series that I cut out back in September consisting of designs inspired by a mid-century modern building I saw on a trip last summer.
I drew a set of retro ornament shapes and cut them out of more monoprint scraps, and stenciled on them with some commercial stencils of geometric design. I thought they complemented the mid-century modern look quite well. I don’t know many more times I can go back to the well of inspiration that is retro ornaments – I have yet to get tired of them!
The next step was to scan the background pieces into the computer and work on them a bit with Photoshop. I altered the colors a little bit on some of these to make them better backgrounds for the ornaments. The real life pieces will be used later in some art projects. I got some more use out of the backgrounds by making them into header images for Google+, Facebook and Etsy – I like to change those seasonally and without the seasonal references I won’t have to change these headers for awhile!
Monoprint leftovers with stenciling on top and a little bit of computer enhancement and collaging.
Next I scanned in the ornament pieces separately and used various Photoshop tools to trim around them and enhance the color a bit to make the stand out better against the backgrounds. I added a drop shadow and a grunge border and exported each composition as a JPEG to import into Illustrator. The card text and further details were done in Illustrator with the addition of the yellow texture imported from Photoshop. The texture was created with a technique I wrote about in my article Analog to Digital: Waste Paper From Stamping Projects Can Enhance Photoshop Art.
The next step is to get these printed and mail them out ASAP!